


English
AeroStream H05 Manual
MODEL NAME
-
VSE-ASH05
Safety Information
Please read the following instructions carefully before using this device. Failure to observe these safety instructions may result in injury and will release Vivosun of all liability and void all product warranties.
-
Ensure that your power source meets the electrical requirements specified for this product.
-
Do not dismantle or attempt to repair or adjust the unit without authorization, as this will invalidate the product’s warranty.
-
Use ONLY distilled water and avoid pouring water into the central pipe to maintain proper functionality of this device.
-
Always turn off and unplug the humidifier before installing, cleaning, or moving it. When not in use, unplug the humidifier from the power outlet.
-
Do not touch the water in the tank or any components in the water with any part of your body while the humidifier is operating.
-
Do not operate the humidifier without water. Doing so may damage the unit.
-
Do not direct the mist outlet towards electrical appliances, such as clip-on fans, lights, or inline fans.
-
Do not cover power cords with rugs or other fabric materials.
-
Do not overfilling. do not allow water to flow or splash into the interior of the unit when cleaning to avoid damaging internal components.
-
Do not place this product in potentially hazardous environments such as flammable, explosive, electrical, or chemically-laden atmospheres.
-
Place it on a flat, sturdy surface to keep it stable and prevent tilting and water spillage.
-
Keep it away from heat sources such as stoves and direct sunlight.
-
Place it in a room-temperature environment to avoid damage from cold temperatures.
-
Keep the humidifier out of reach of children.
-
Please read the following instructions carefully before using this device. Failure to observe these safety instructions may result in injury and will release VIVOSUN of all liability and void all product warranties.
SAVE THESE INSTRUCTIONS
Key Features
|
User-friendly Design : Its opaque black water tank, ergonomic design, and top-fill feature make it versatile for various uses. |
|
Precise Readings : Compatible with external temperature and humidity probes for precise, targeted environmental readings. |
|
Versatility : Equipped with a range of accessories to suit dierent usage scenarios. |
|
Phantom Mode : Turn off the screen while operating to prevent light pollution. |
|
Low Water Level Alert : Real time alerts to ensure uninterrupted operation |
Product Contents
| Image | Name | Quantity |
|---|---|---|
Bottom Module |
1 PC |
|
|
Water Tank |
1 PC |
|
Top Cover |
1 PC |
|
Mist Outlet |
1 PC |
|
Flexible Hose |
1 PC |
|
Cleaning Brush |
1 PC |
|
Temperature & Humidity Sensor 3m |
1 PC |


SPECIFICATIONS
Dimensions |
7.4” x 7.4” x 13.9” 188 x 188 x 352 mm |
Net/Gross Weight |
3.7lbs/4.4lbs 1.7kg/2.0kg |
Water Tank Capacity |
1.32 gal (5L) |
Max Humidity Output Rate |
8.45 fl oz/h (250 ml/h) |
Voltage |
100-240V AC |
Frequency |
50/60Hz |
Wattage |
28W |
Noise Level |
≤ 35dB |
Operating Temperature Range |
41°F to 122°F (5°C to 50°C) |
Operating Humidity Range |
20%-99% RH |
Wi-Fi Operation Frequency |
2.4GHz(2412-2484MHz) |
Maximum Power |
20dbm |
Installation
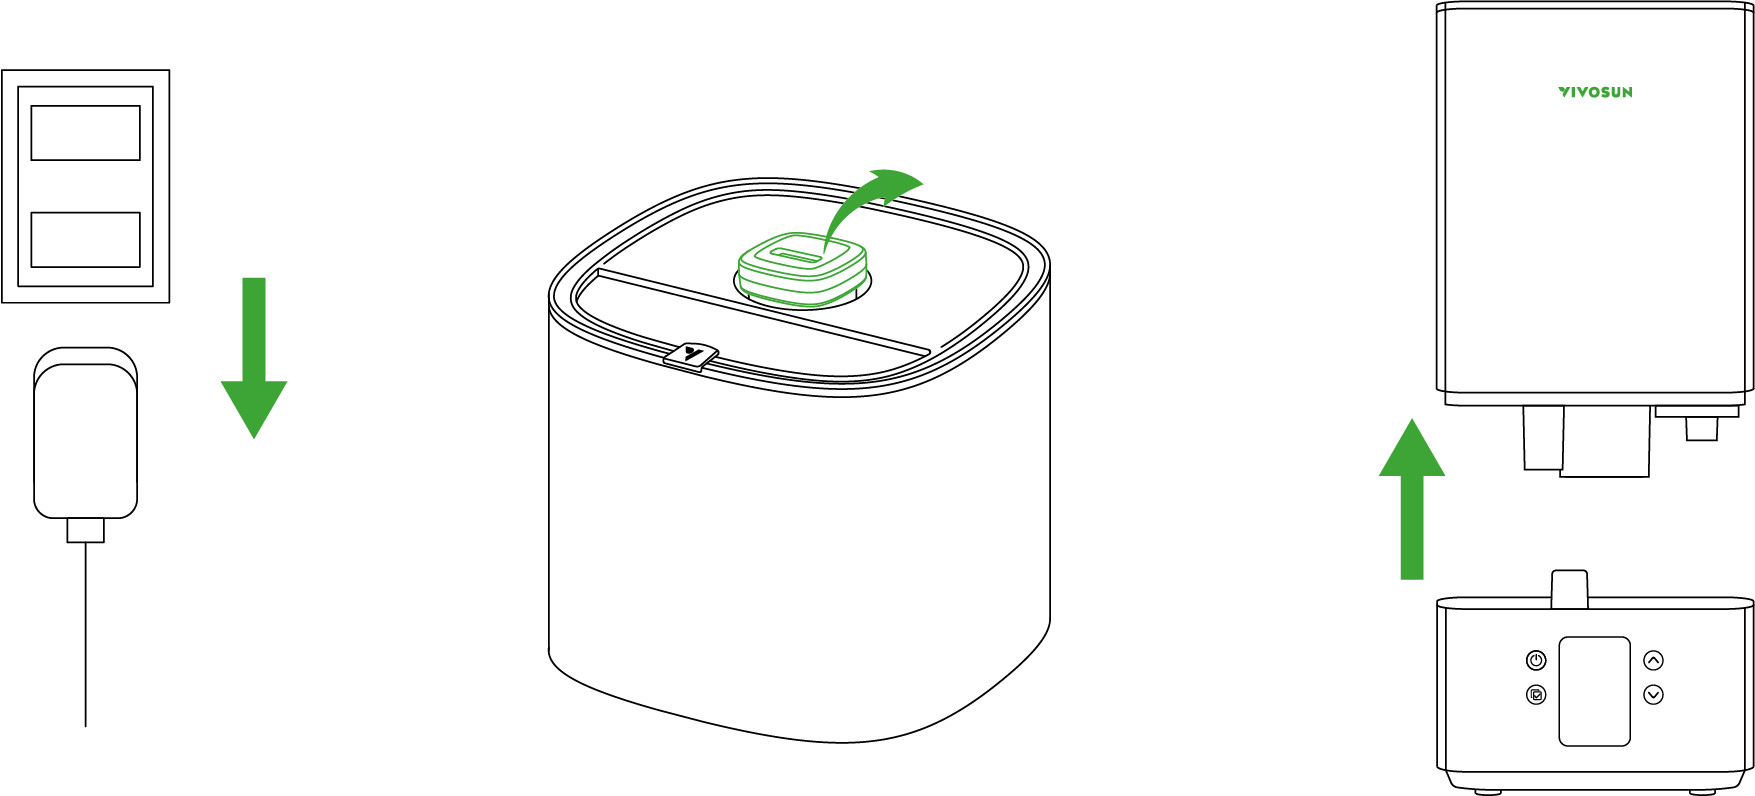
STEP 1
Please remove the AeroStream from its packaging, take off the protective bag, and ensure that the protective foam is removed from the bottom module.
STEP 2
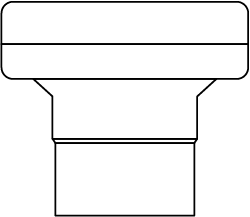
Assemble the top cover, water tank, and bottom module .
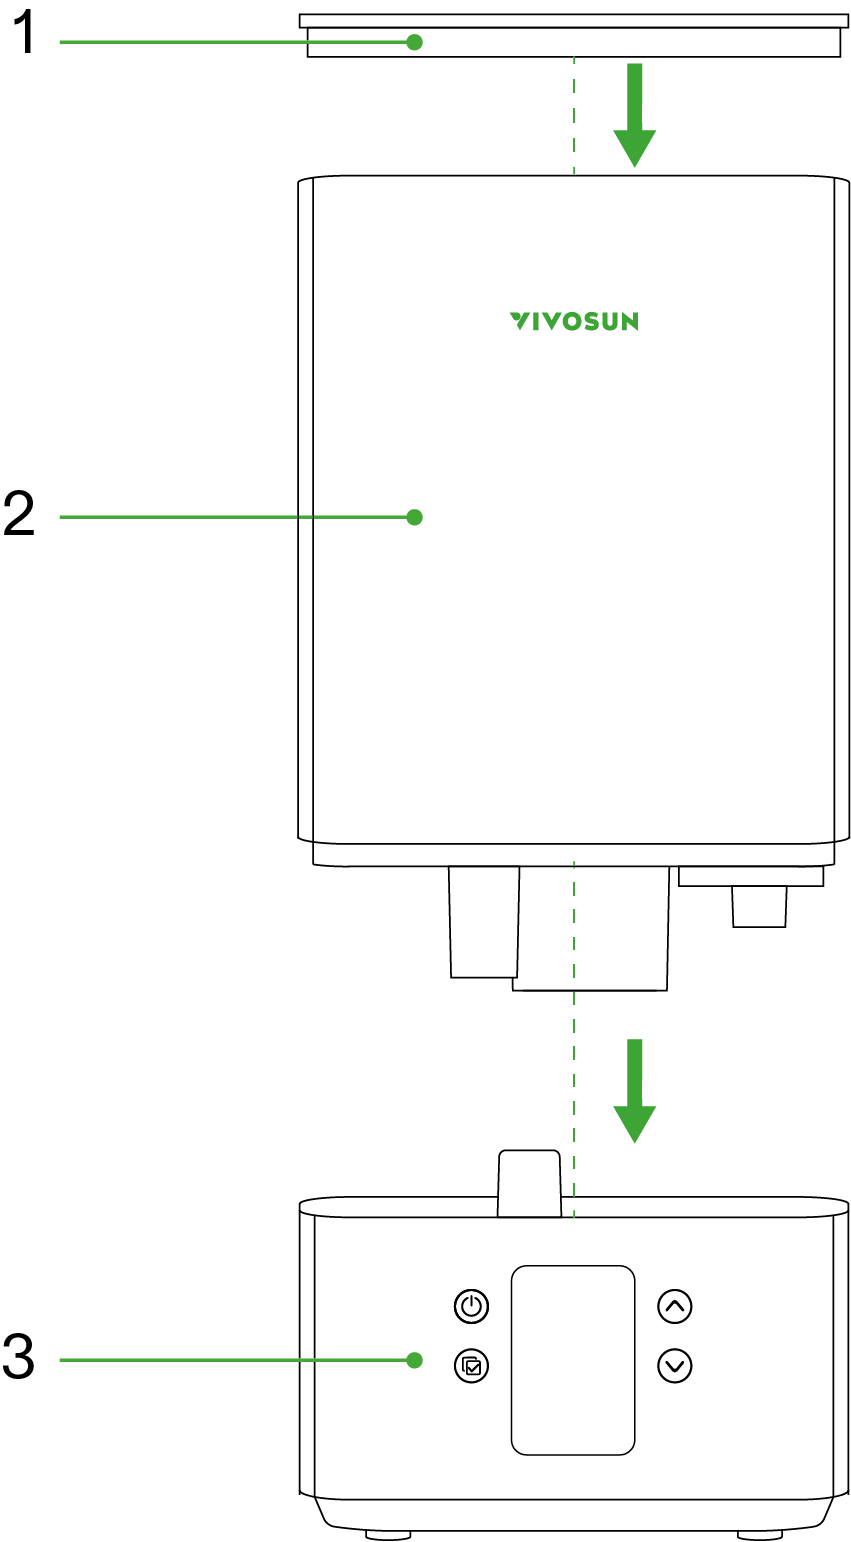
*1. Top Cover
 2. Water Tank
 3. Bottom Module
STEP 3
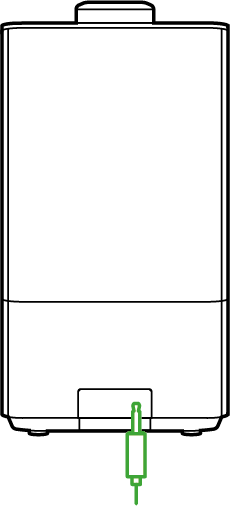
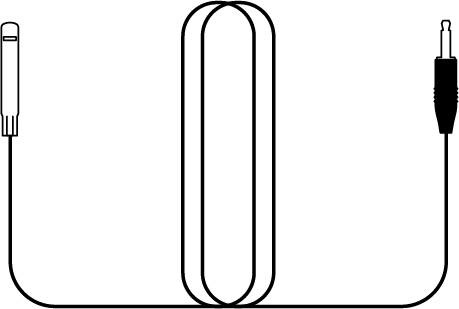
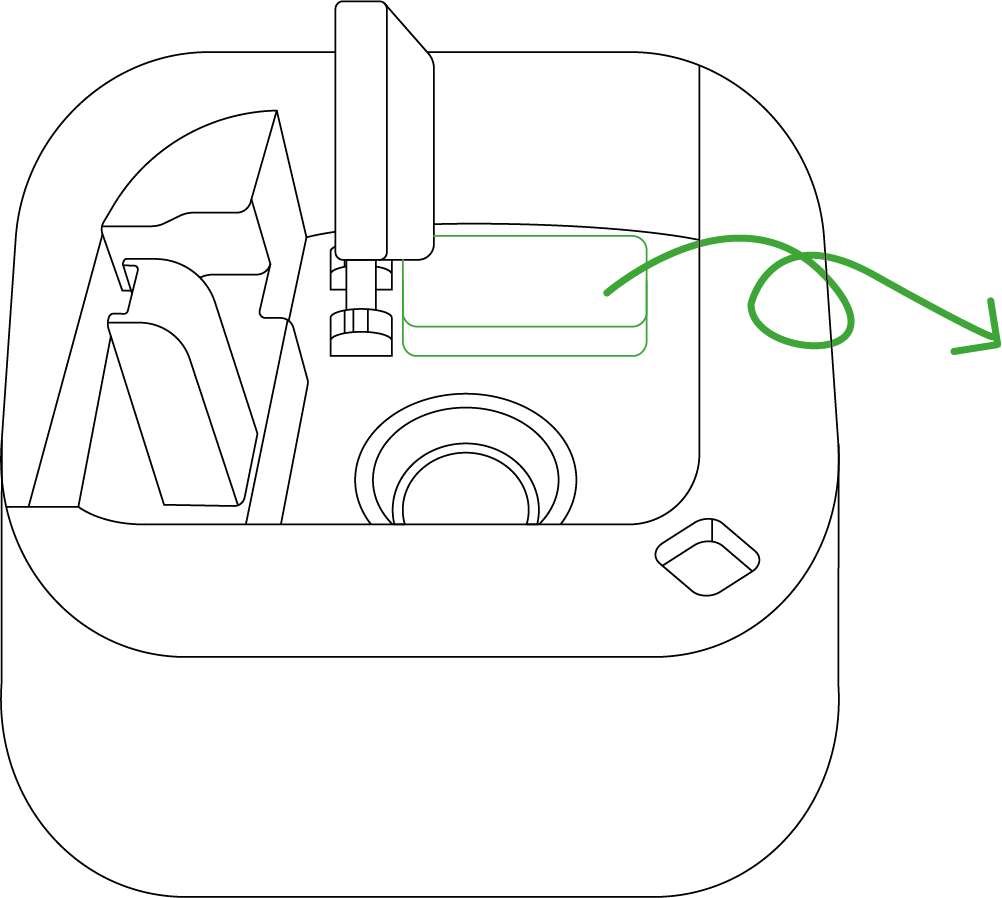
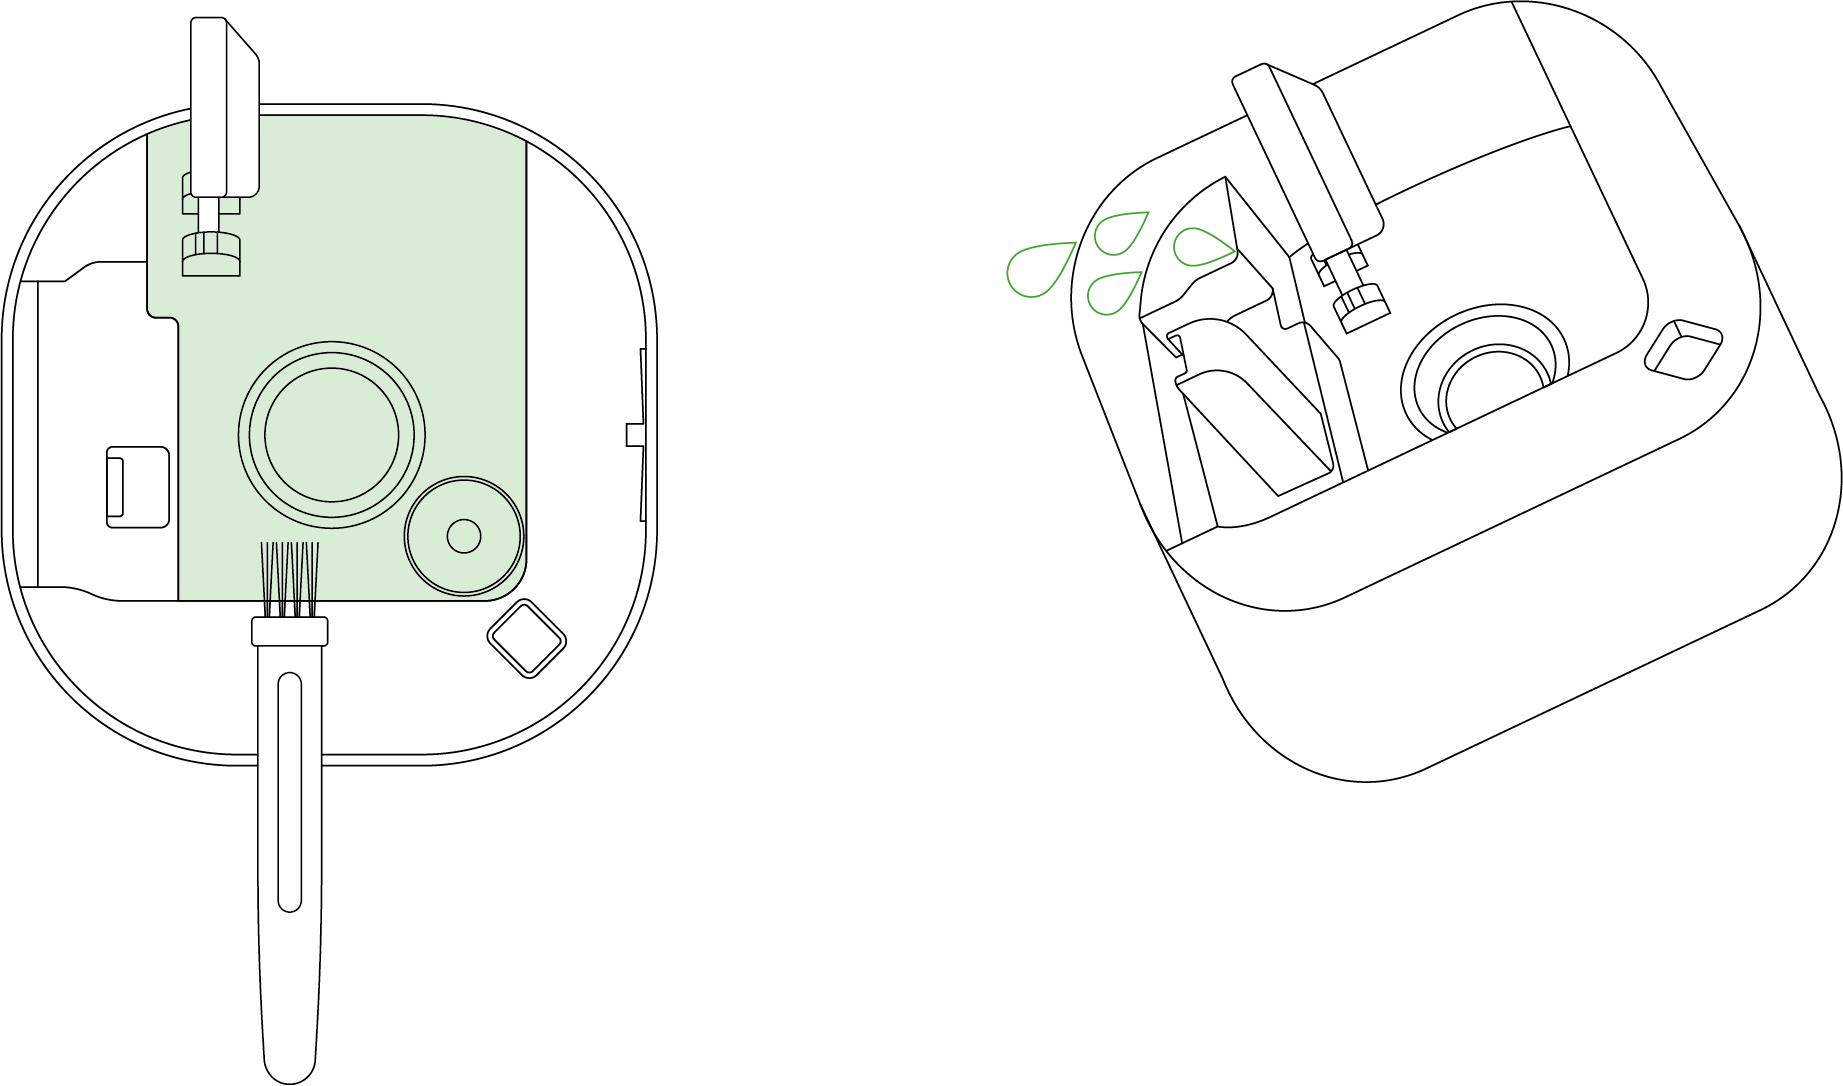
Insert the temperature and humidity probe into the 2.5 mm jack input located to the right of the power cord. Point the probe at the desired area and secure it in place.
Tip: When inserting the jack, listen out for a distinct clicking noise. This sound confirms that the jack is properly and securely locked into place.
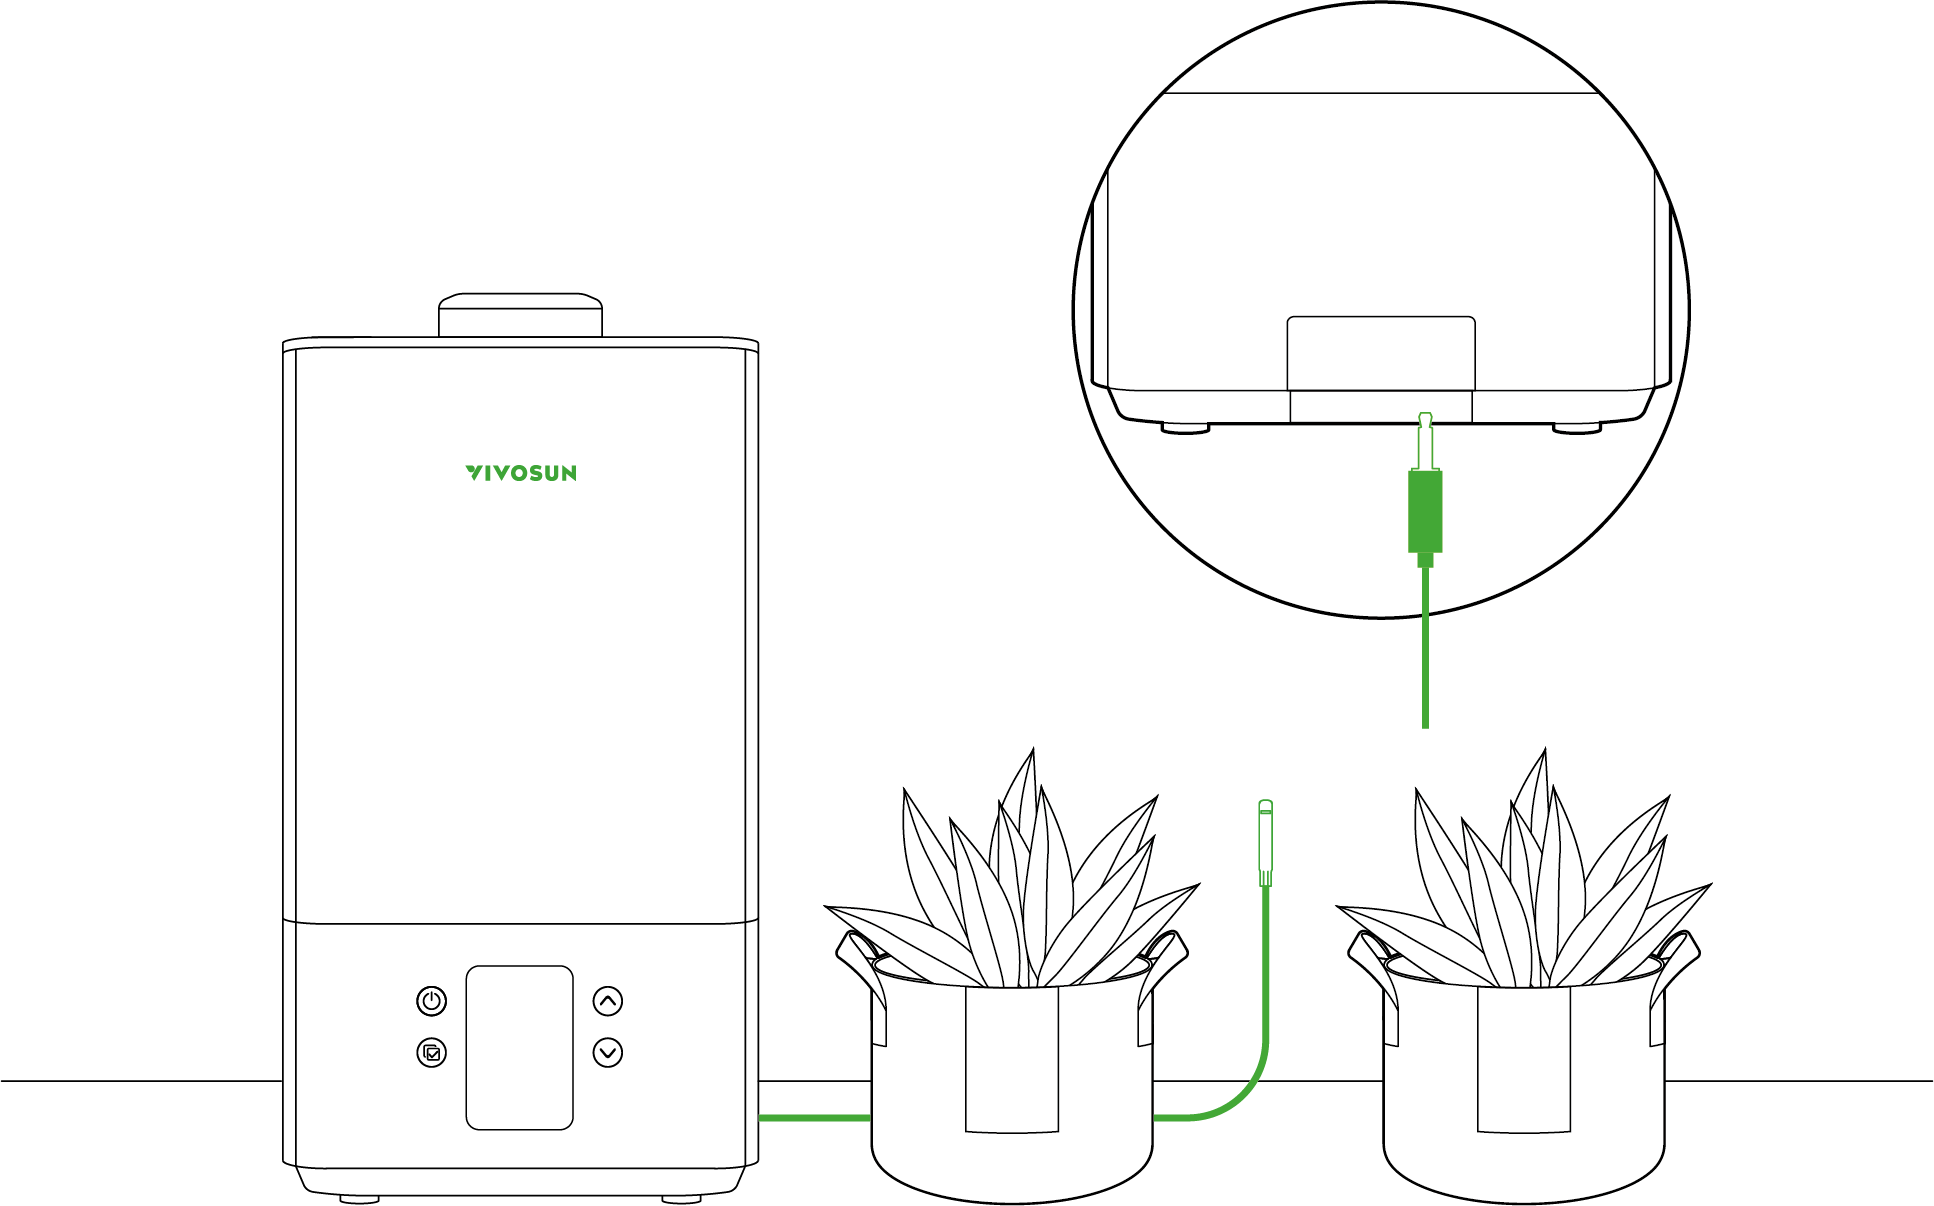
When the temperature and humidity probe is not connected, the screen will display "--".

STEP 4
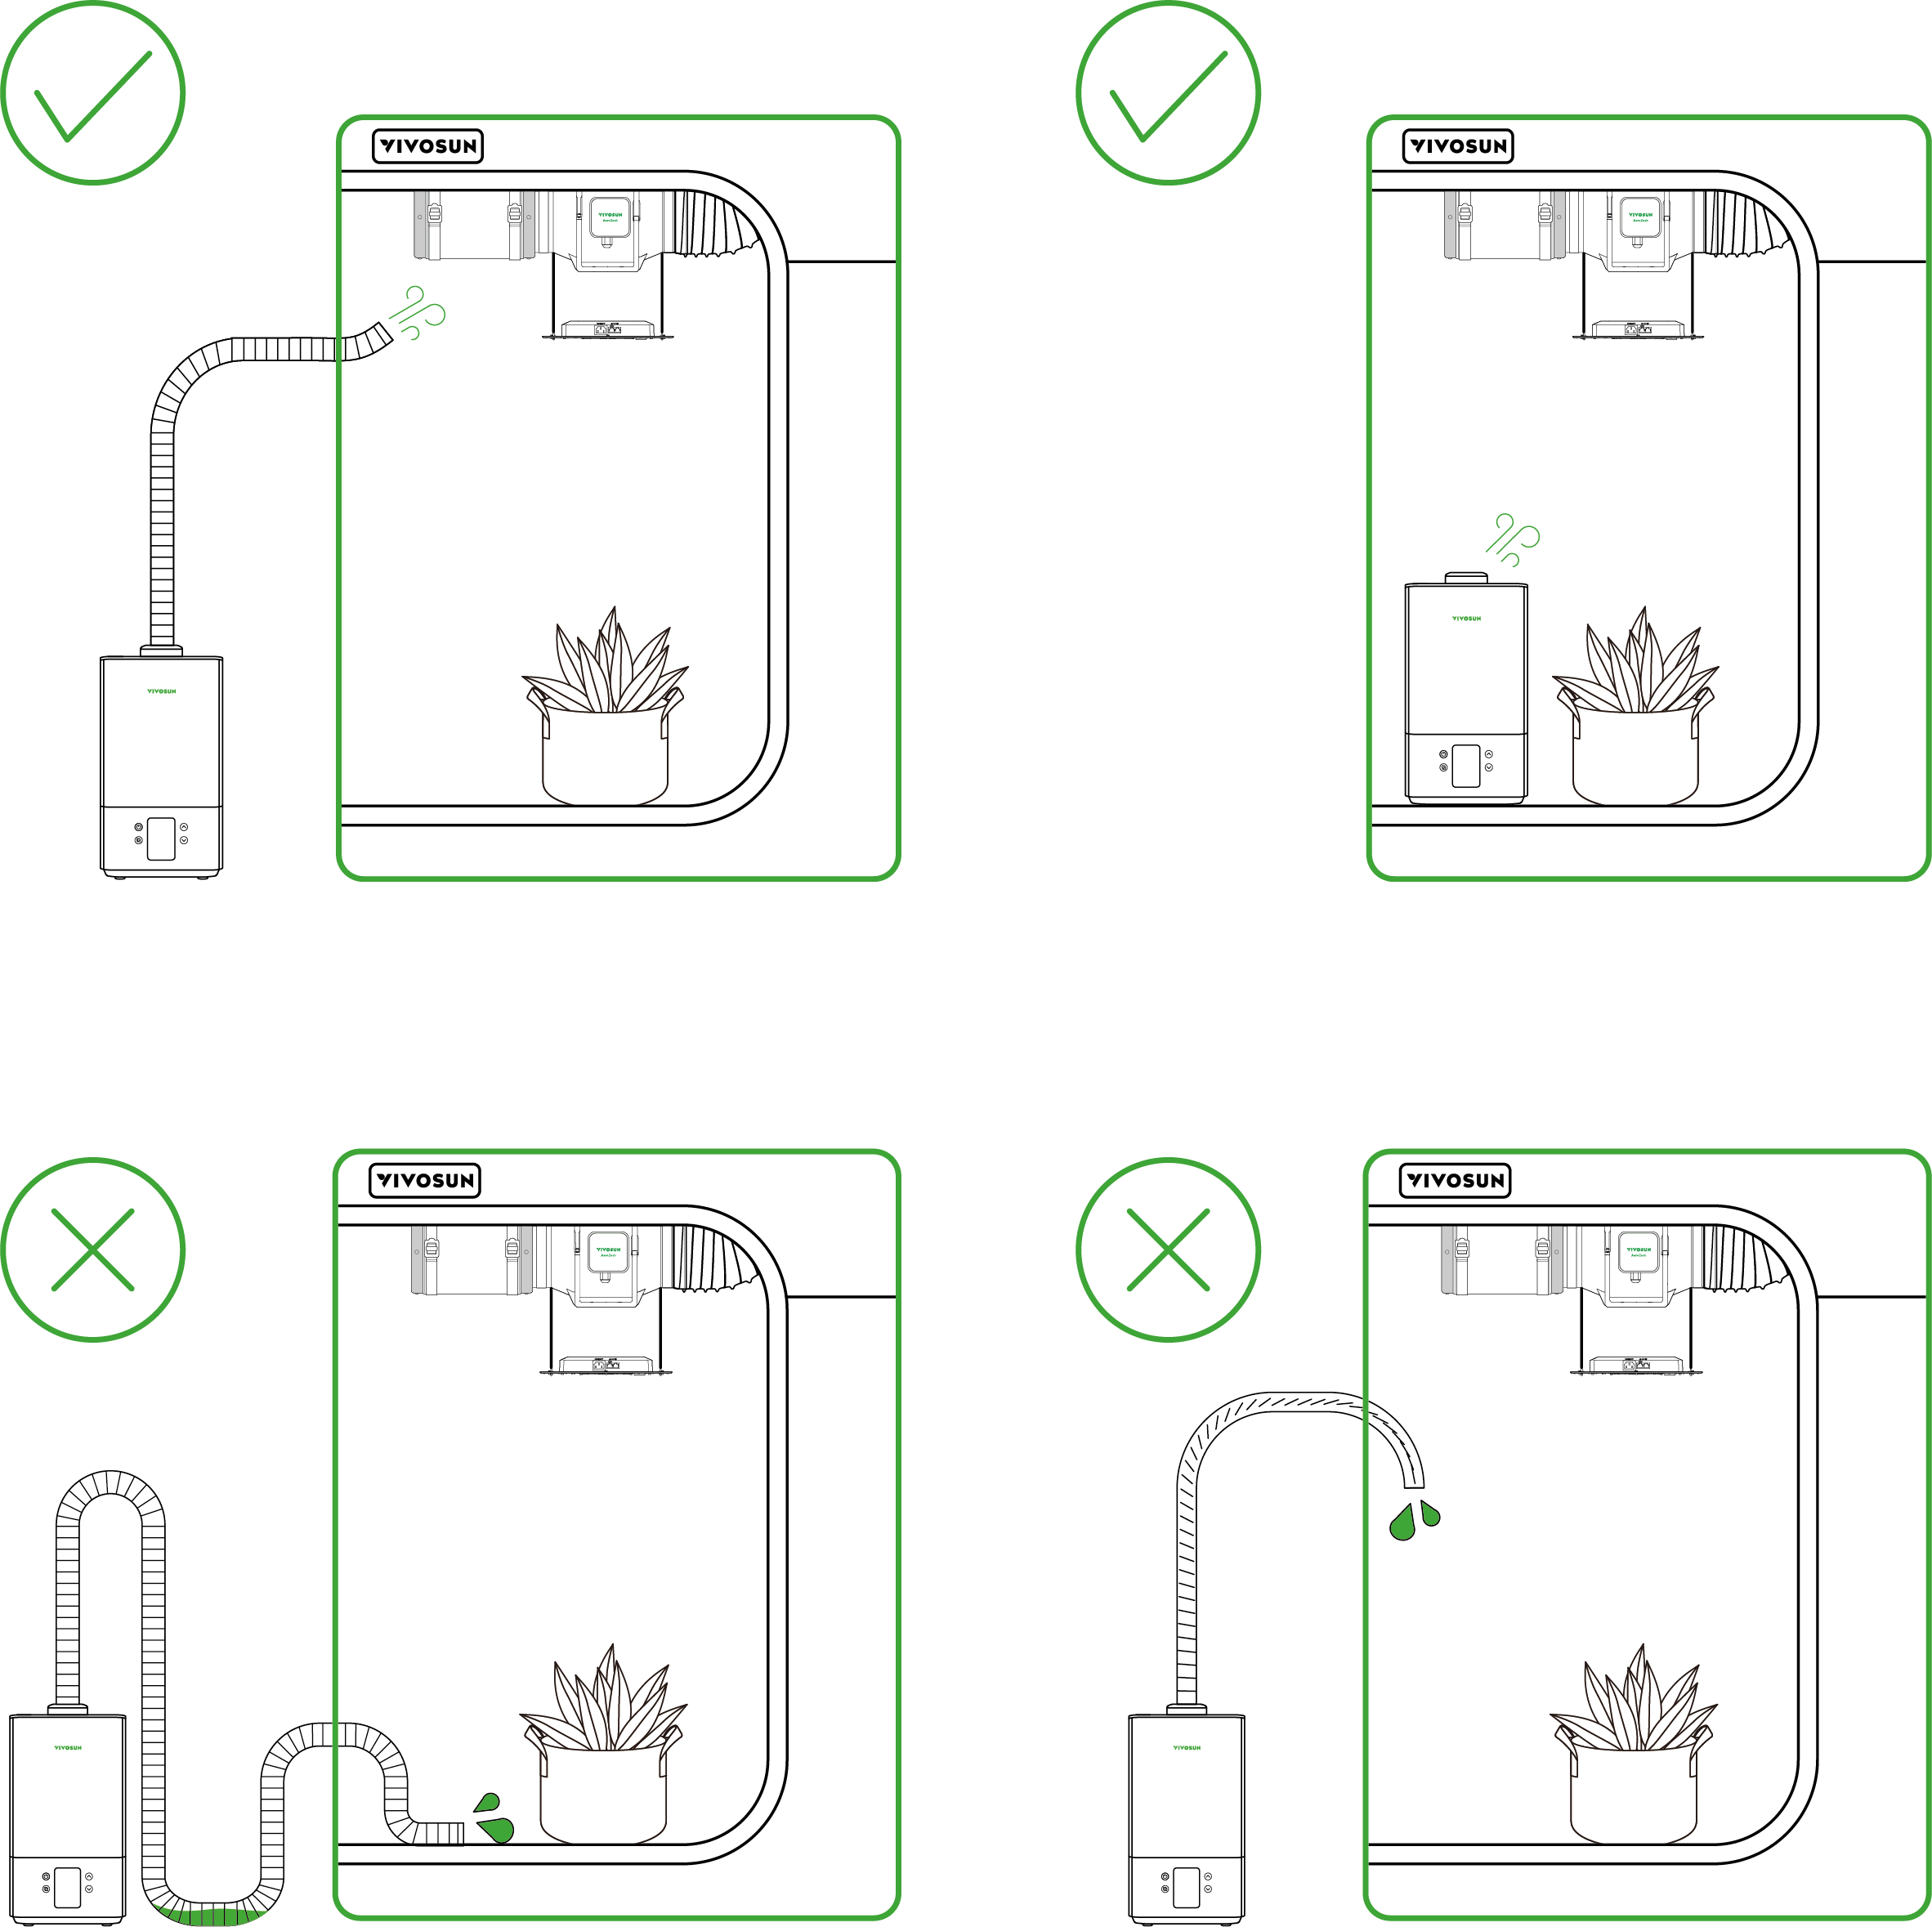
Depending on the specific scenario, attach either the Mist Outlet or the Flexible Hose. When using the flexible hose, please note the following:
-
Avoid creating U-bends in the hose, as this may cause water accumulation, leading to spillage or obstructions.
-
The mist outlet must always be pointed upwards.
-
Dry the hose every time after use.
STEP 5
Slowly fill the water tank, paying close attention to the water level to avoid overflow and spillages.
Caution: DO NOT fill the water tank via the mist pipe.
Note: For optimal performance, use DISTILLED WATER ONLY. Clean and maintain the AeroStream on a weekly basis.
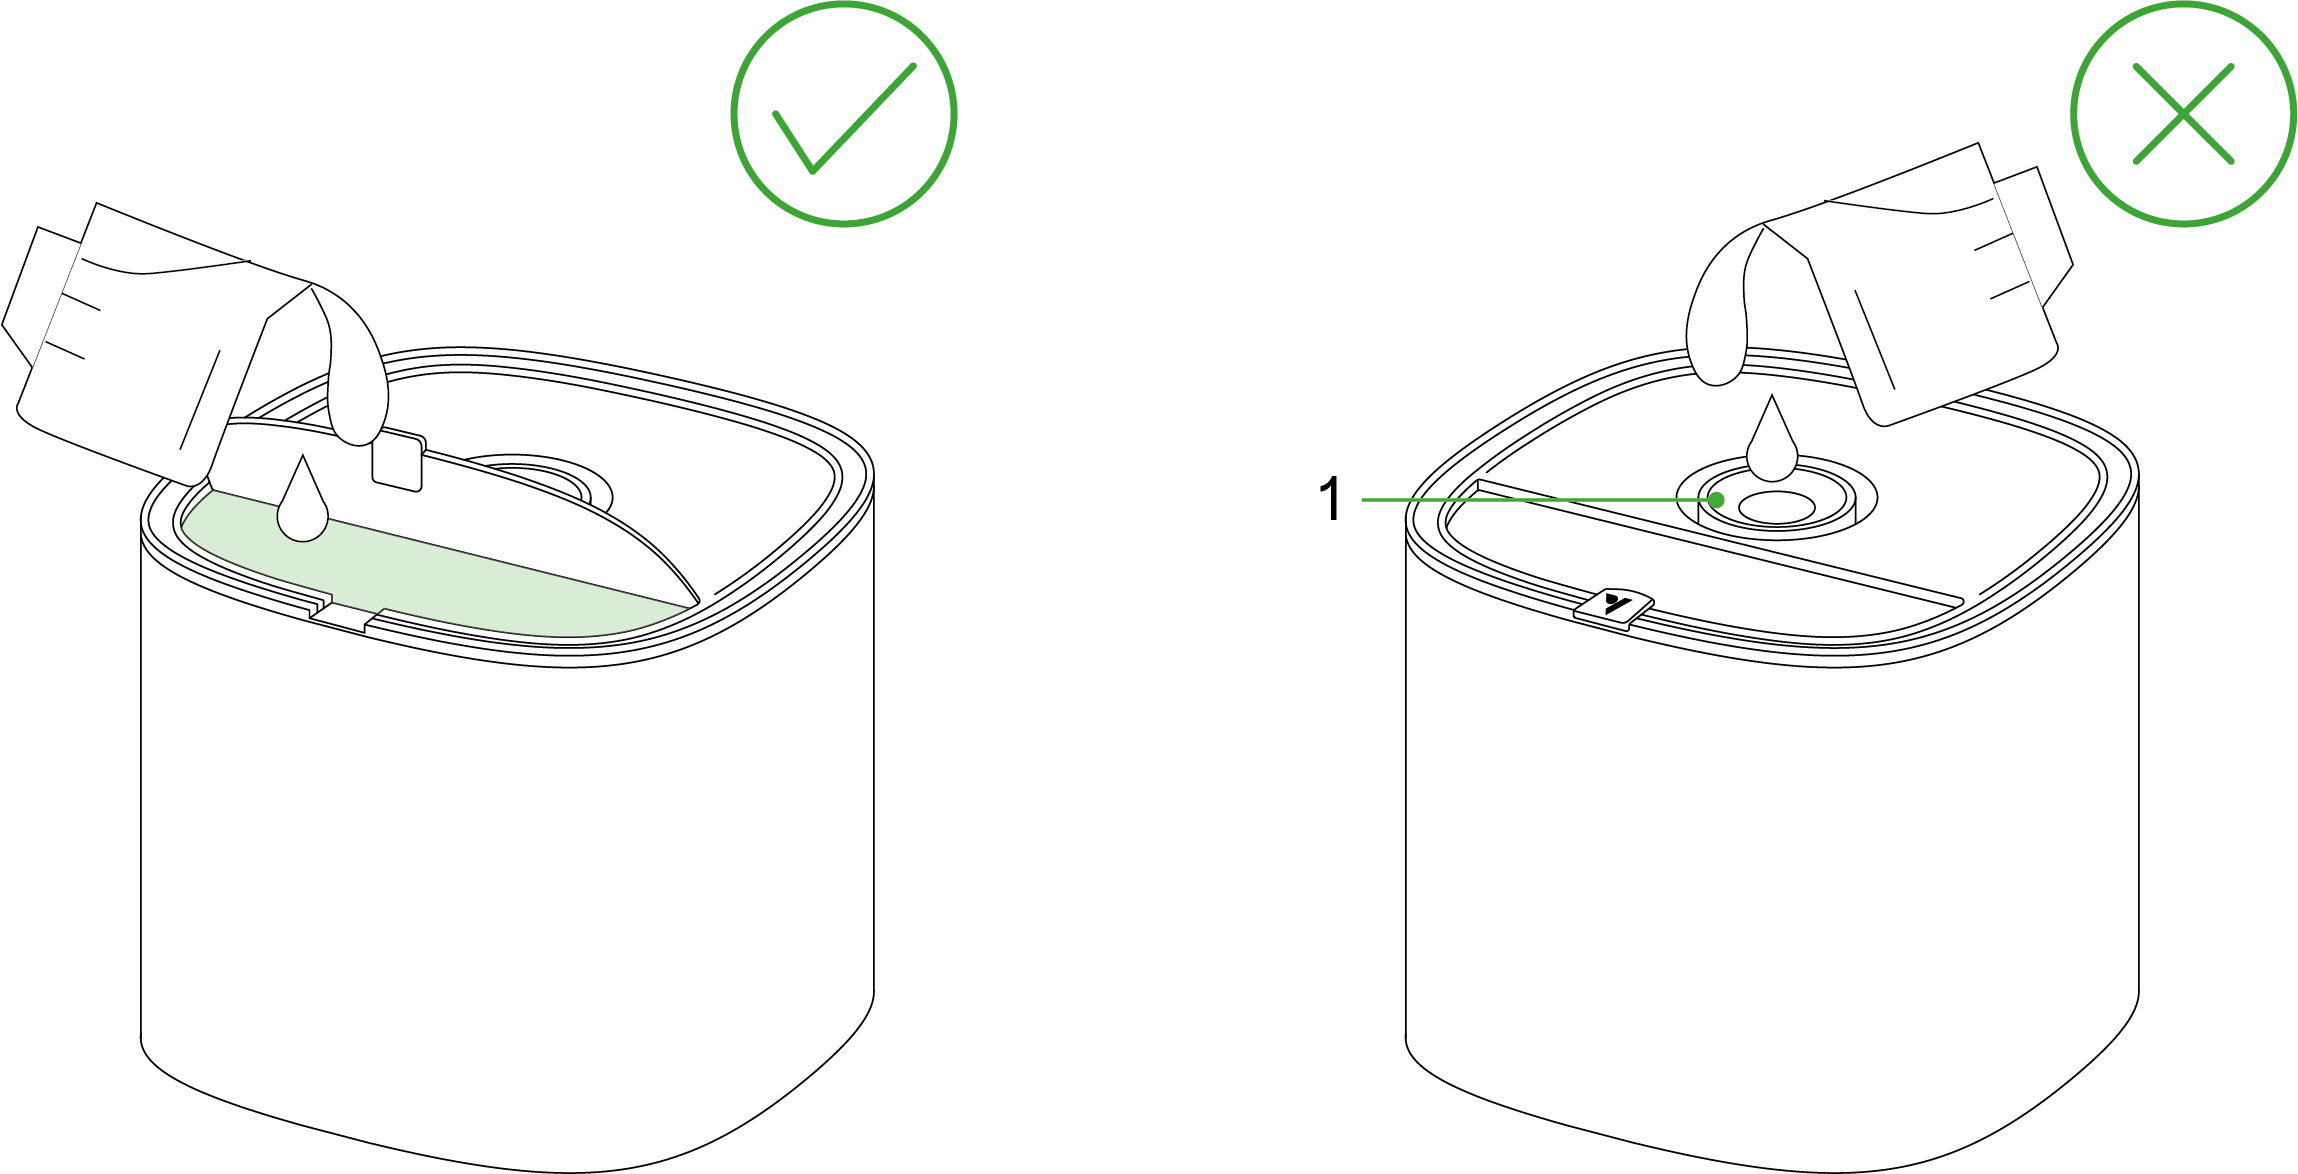
*1. Mist Pipe
STEP 6
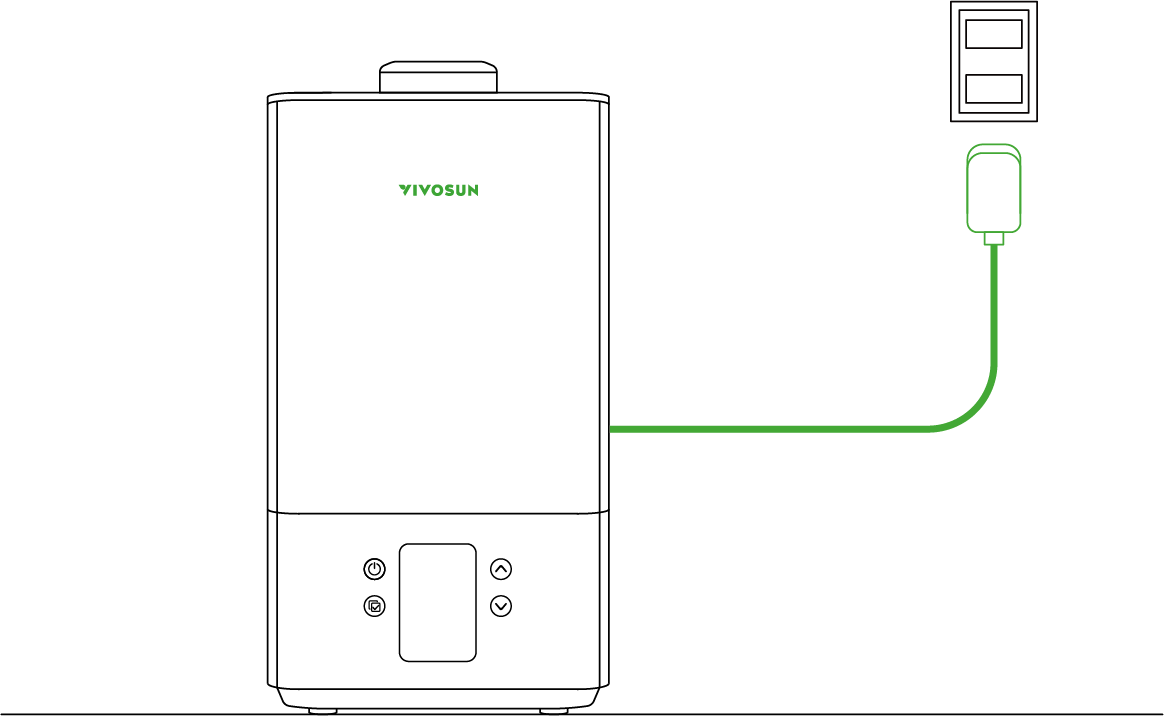
Plug in the power cord and enjoy your AeroStream.
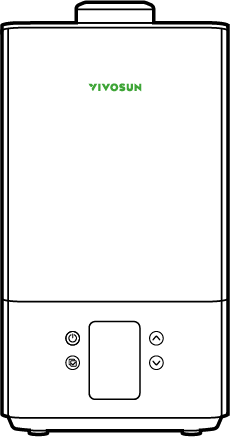
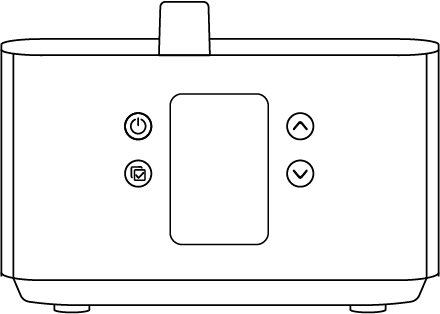
Control Panel
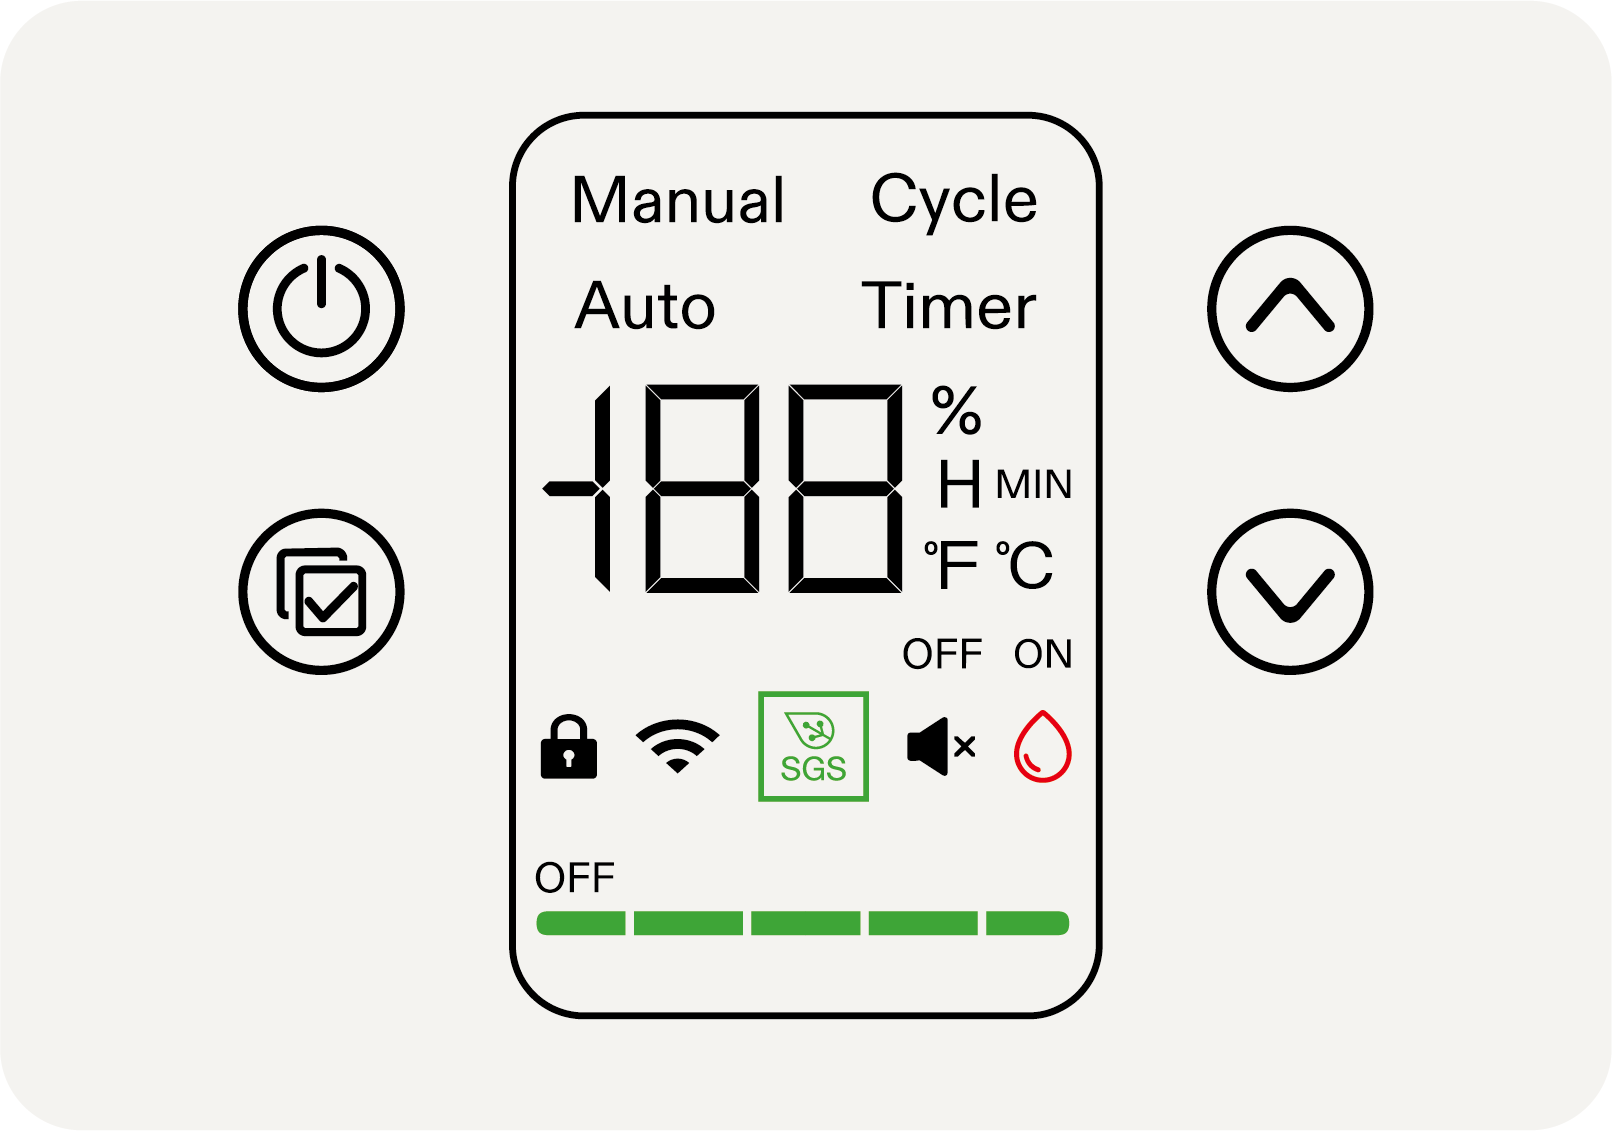
|
On/Off Button |
Press to turn On. Press and hold for 3 seconds to turn Off. |
|
Menu/Confirm Button |
Press and hold to select modes. Switch between Manual, Cycle, Auto and Timer and press the Menu Button again to confirm. |
|
Up Button |
Press to increase the value of the current setting (Mist Level, Time, etc.) |
|
Down Button |
Press to decrease the value of the current setting (Mist Level, Time, etc.). |


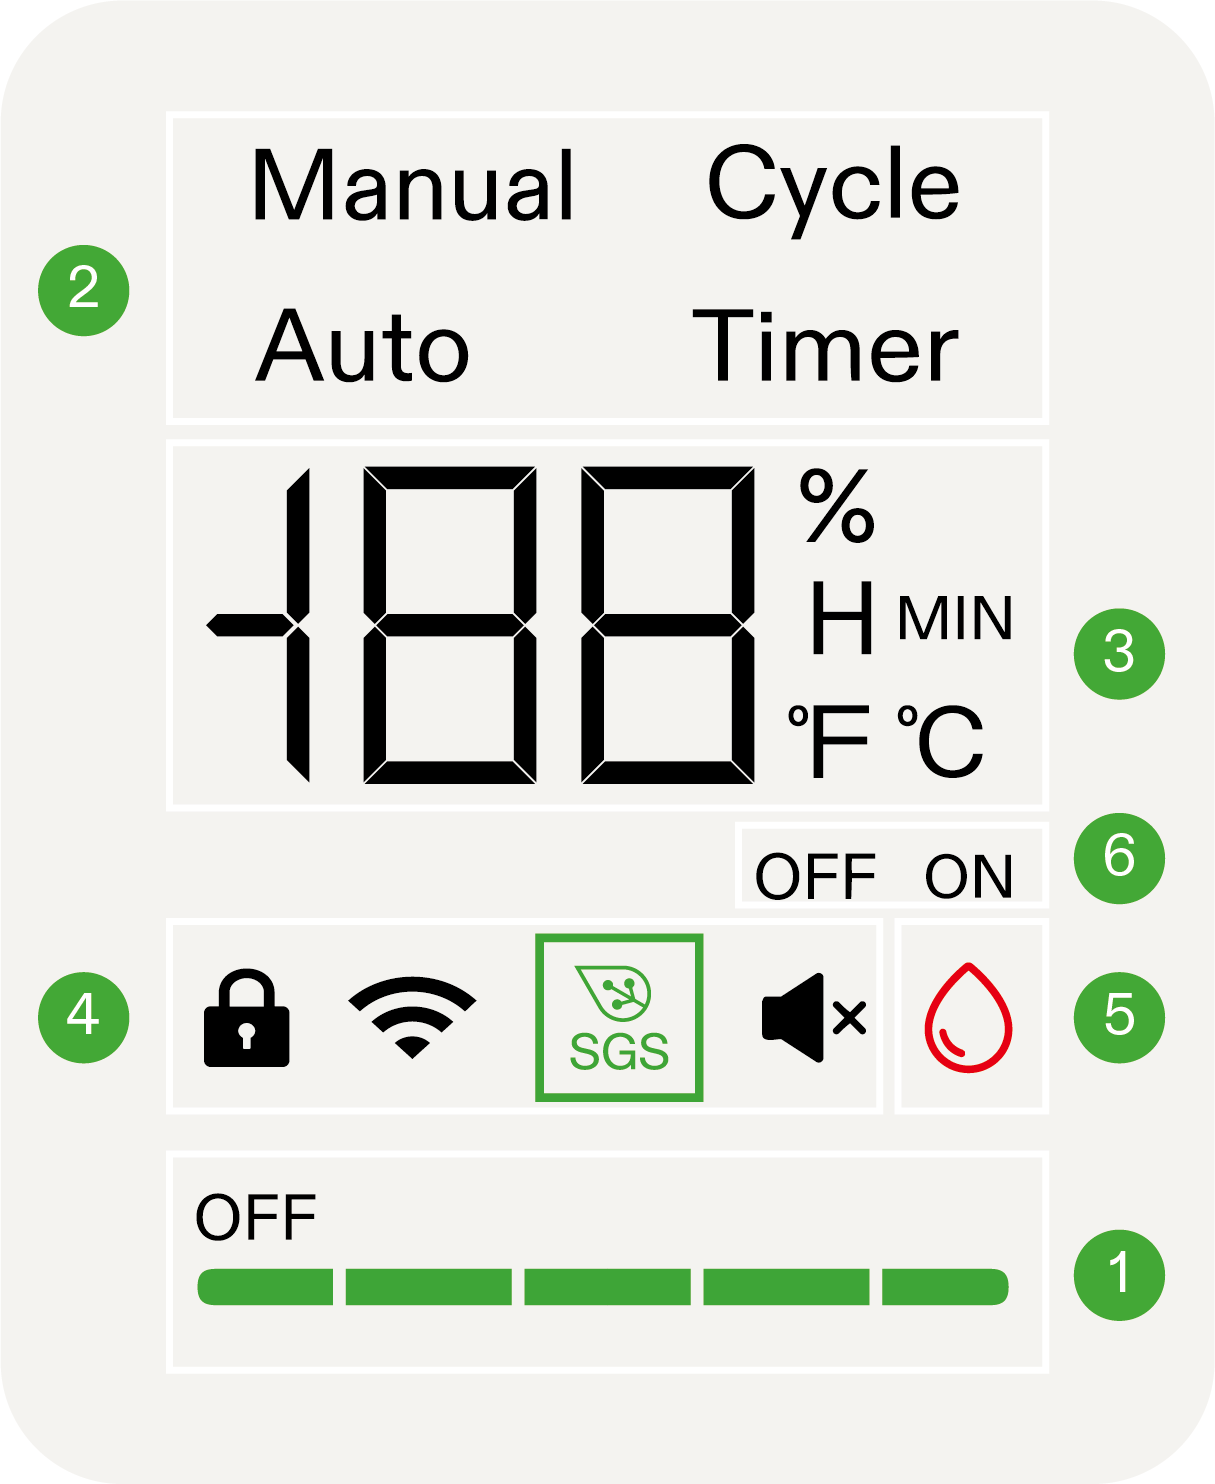
1 |
Mist Level |
Current Mist Level. |
2 |
Operating Modes |
Manual, Cycle, Auto, Timer. |
3 |
Probe Reading |
Alternately displays the current humidity and temperature. Displays remaining time in Cycle and Timer mode. |
4 |
Status Icons |
Displays the setting status, including (cloud) lock, Wi-Fi, SGS connectivity and mute. ● No Wi-Fi icon indicates the AeroStream is offline. ● Wi-Fi icon will flash when searching and connecting to a network. |
5 |
Water Level Icon |
Displays the water level status of the device. When the water level is low, the icon lights up. |
6 |
Operational Status |
OFF indicates the device is paused. ON indicates the device is running. Operation duration is displayed when setting parameters in Cycle and Timer modes. |
Operating Modes
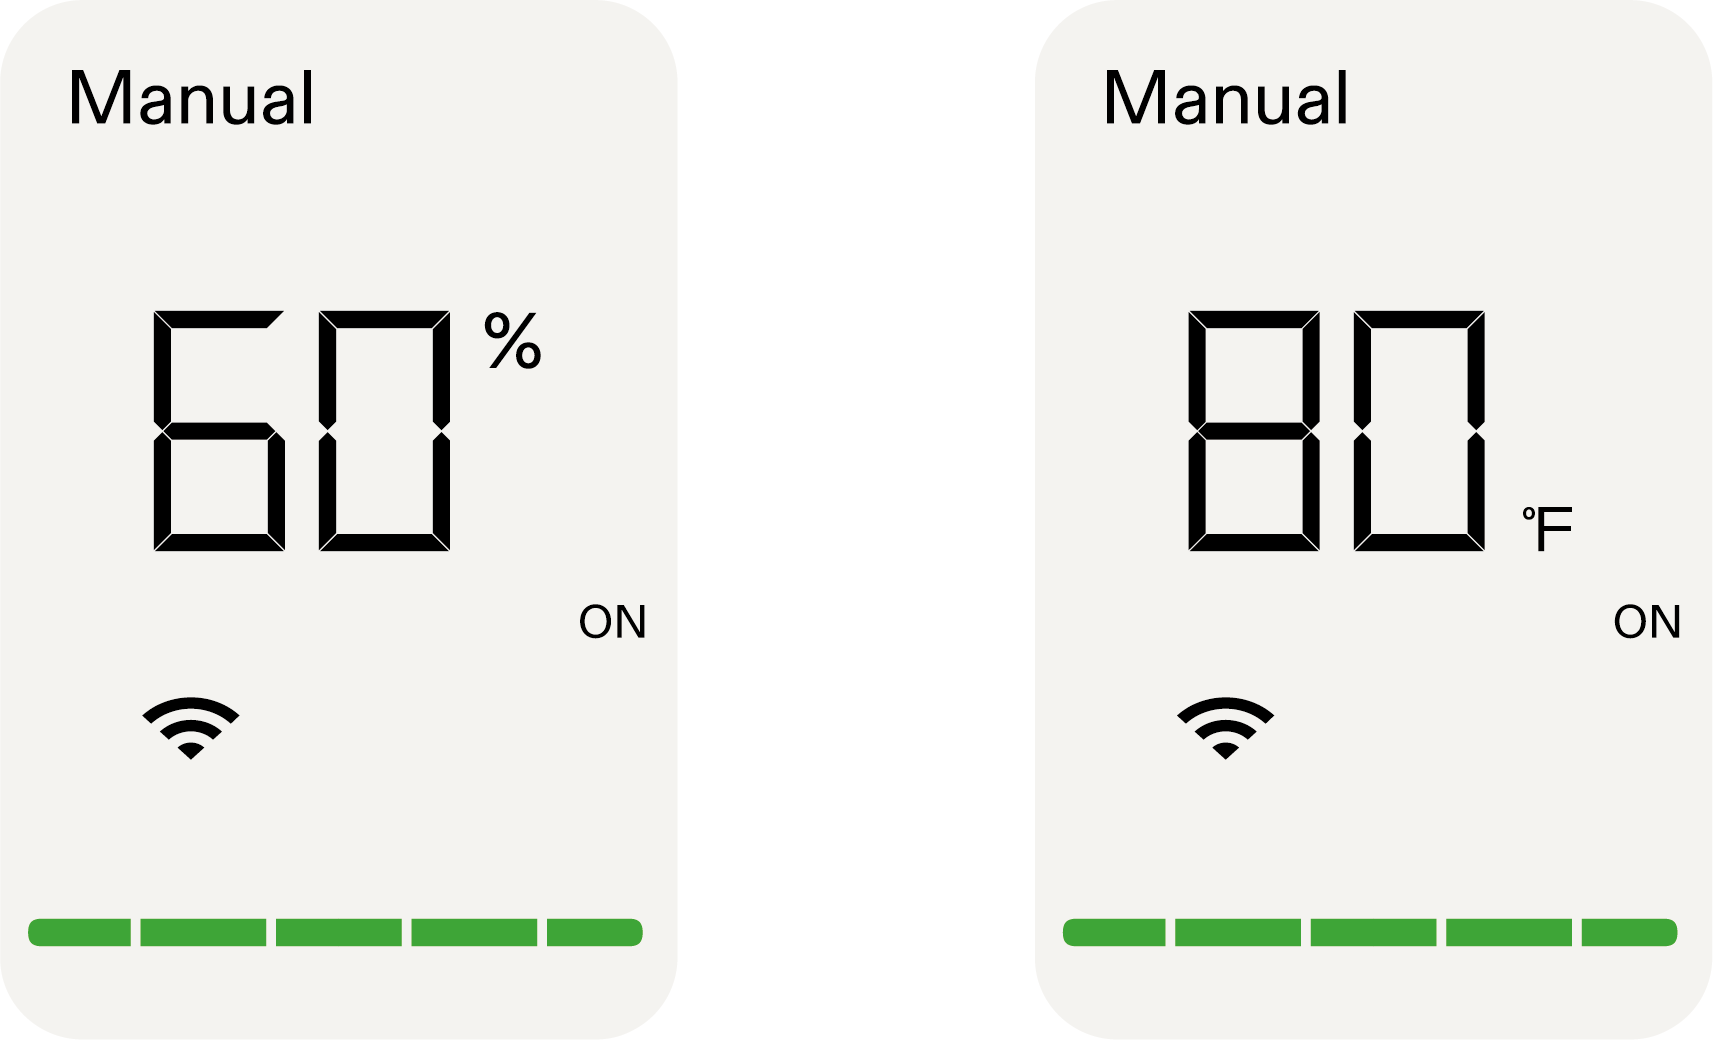
Manual Mode:
The device operates based on the mist level set in Manual Mode.
To enter Mode Selection, press and hold the Menu button. Use the Up or Down buttons to select Manual Mode, then press the Menu button again to confirm. Adjust the mist level using the Up and Down buttons, and press the Menu button once more to activate Manual Mode.
In this mode, the screen will alternate between displaying the mist level, current humidity, and temperature.
Cycle Mode:
The device will cycle and run continuously based on the set mist level and run/pause intervals.
To enter Mode Selection, press and hold the Menu button. Use the Up or Down buttons to select Cycle Mode, then press the Menu button to confirm. Set the operating (On) and rest (Off) durations using the Up/Down buttons, and press the Menu button to confirm. Next, adjust the mist level with the Up/Down buttons, and press the Menu button to activate Cycle Mode.
In this mode, the screen will alternate between displaying the mist level, current humidity, temperature, and remaining run/pause time.

*03H ON: Under this configuration, the device will operate for 3 hours.
 02H OFF: Under this configuration, the device will pause for 2 hours.
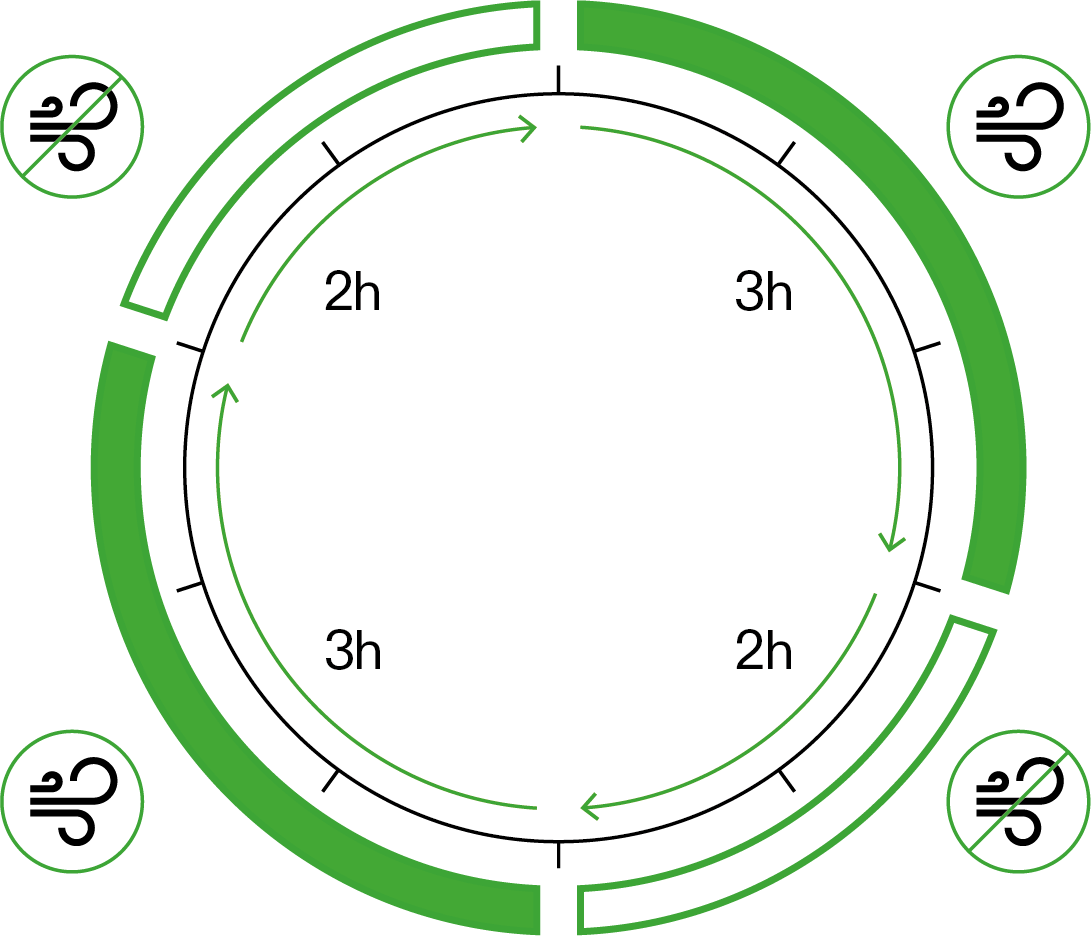
-
The device only displays the duration setting accurate to the hour and rounds up to the nearest whole number. For precise minute settings, please refer to the Vivosun app.
Auto Mode:
The device operates based on the set mist level and humidity threshold (Low Humidity Trigger). When the humidity drops below the threshold, the humidifier will start; when the humidity rises above it, the humidifier will stop.
To enter Mode Selection, press and hold the Menu button. Use the Up/Down buttons to select Auto Mode, then press the Menu button to confirm. Set the target humidity with the Up/Down buttons and press Menu to confirm. Next, adjust the mist level and press Menu again to activate Auto Mode.
In this mode, the screen will alternate between displaying the mist level, current humidity, temperature, and operating status.
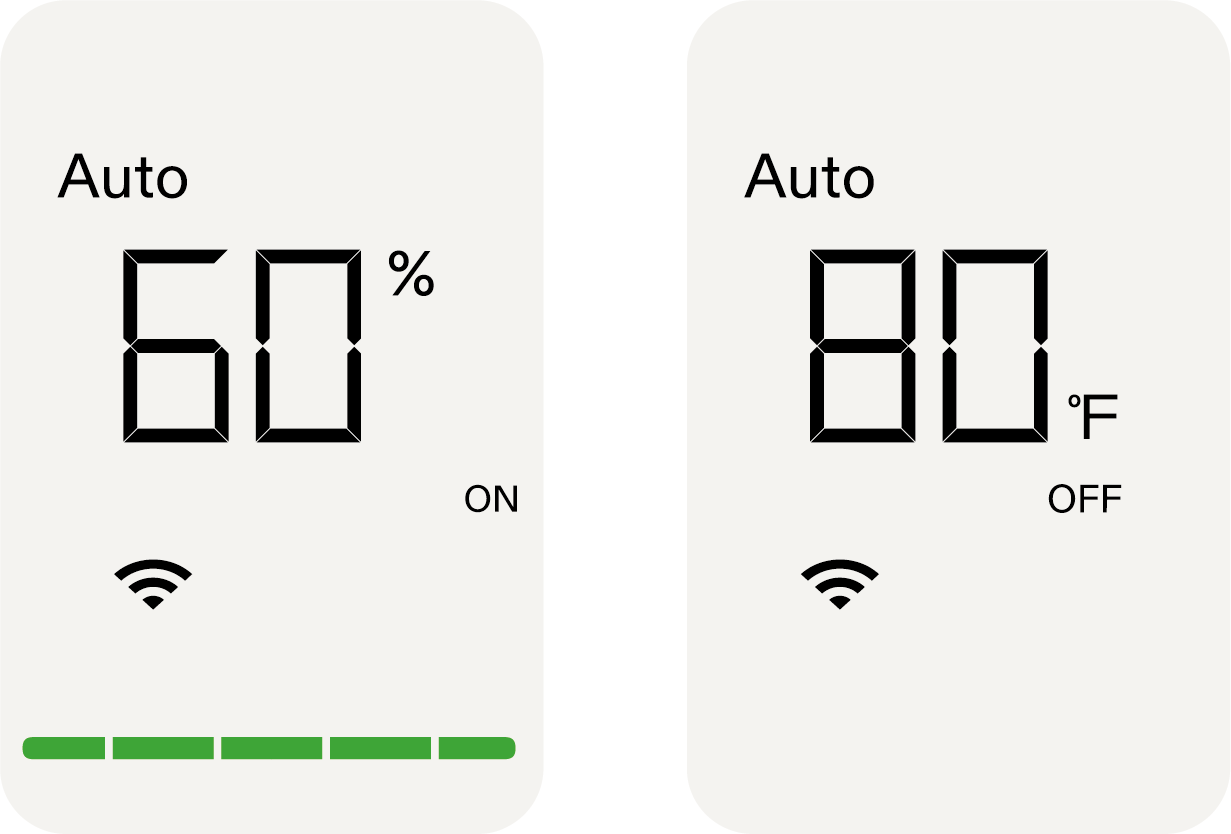
Humidity Trigger

Timer Mode:
The device will run based on the set mist level and operating time. Once the timer ends, the device will stop.
To enter Mode Selection, press and hold the Menu button. Use the Up/Down buttons to select Timer Mode, then press the Menu button to confirm. Set the desired operating duration with the Up/Down buttons, and press Menu to confirm. Next, adjust the mist level and press Menu again to activate Timer Mode.
In this mode, the screen will alternate between displaying the mist level, current humidity, temperature, and remaining operating time.
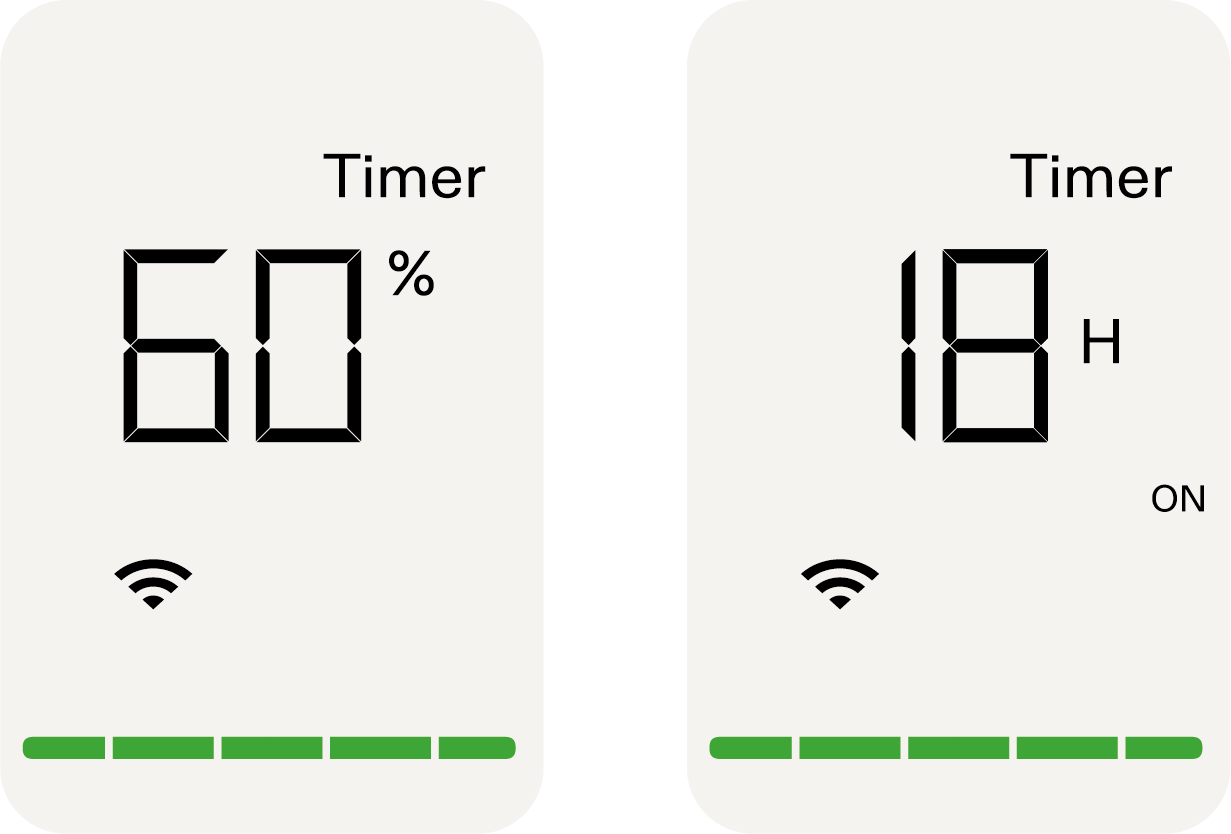
Time Trigger

-
The device only displays the duration setting accurate to the hour and rounds up to the nearest whole number. For precise minute settings, please refer to the Vivosun app
Other Settings
Function |
Operation |
Switch Temp Unit |
Press and hold the Up button to switch between °C and °F. |
Mute Device |
Press and hold Down Button to mute/unmute. |
Device Lock |
Press and hold the On/Off and Up buttons for 3 seconds to lock or unlock the device. Note: When the device is locked, settings cannot be adjusted. |
Phantom Mode (Hide Screen) |
Press and hold the On/Off and Up buttons for 3 seconds to first lock the device. Then press the On/Off button again to enter Phantom Mode (hide the screen). Press any button to light up the screen again. |
Exit Recipe |
Press and hold the Menu button for 3 seconds to exit a Recipe while a Recipe is running |
Screen Auto-Off |
Set Panel Auto-Off via Vivosun App |
Factory Reset |
Press and hold the On/Off and Menu buttons for 3 seconds to reset the device to factory settings. |
Low Water Level Alert
This alert will display when the water level is low, and the device will pause operation until it is refilled. If connected to the Vivosun App, you will receive a low water level push notification.
To resume operation, refill the water and press the On/Off button.
The alert icon will flash when any button is pressed.

Wi-Fi Configuration
Connect AeroStream to Vivosun App
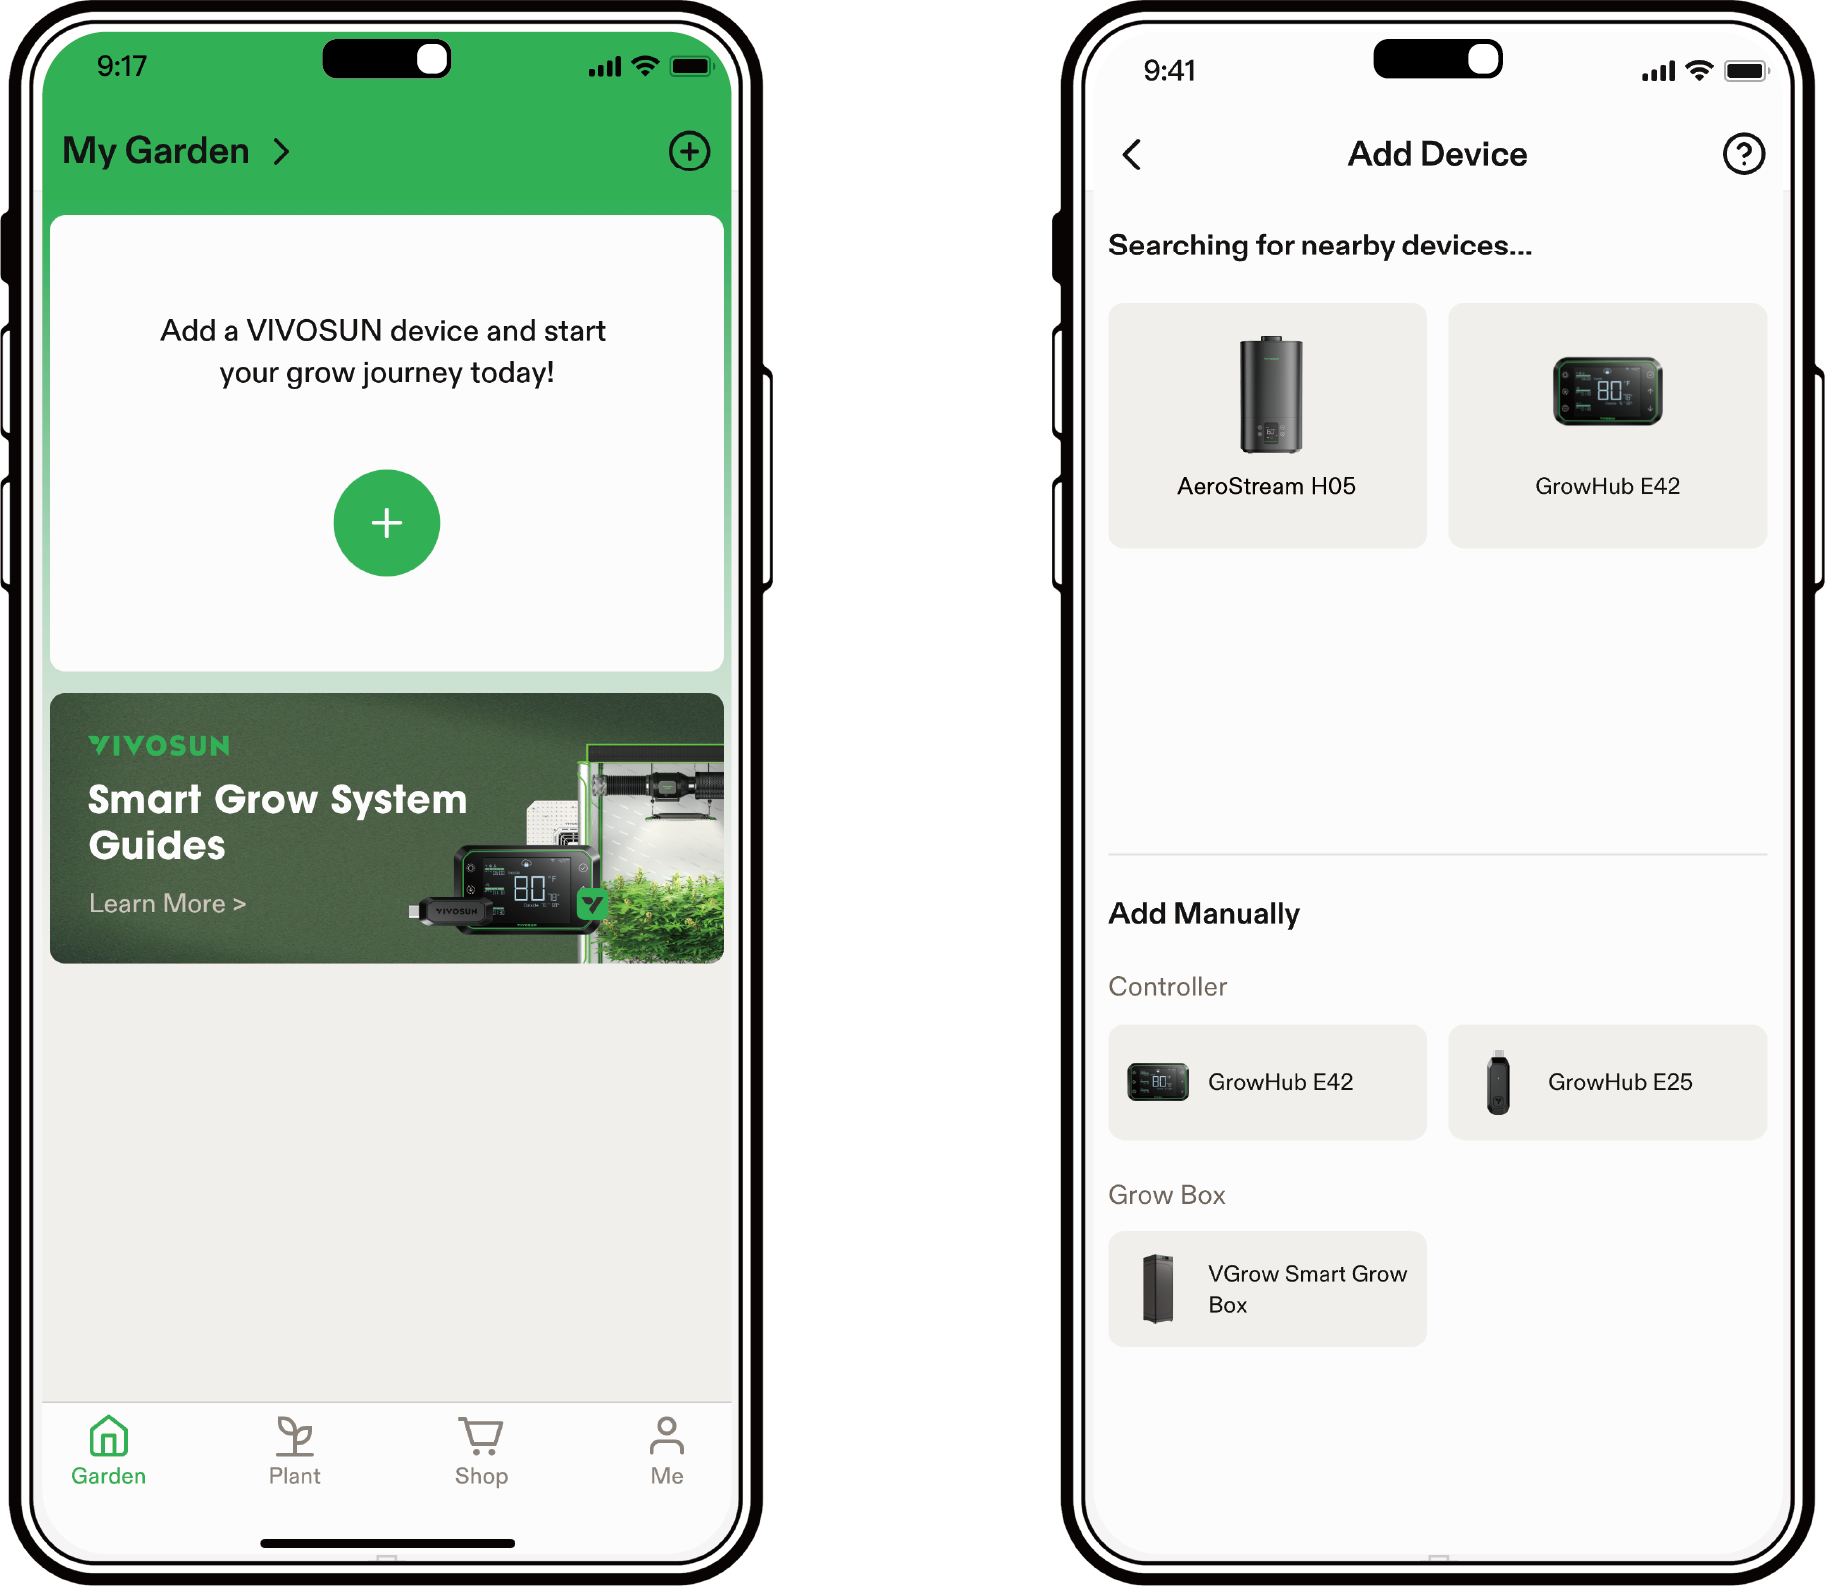
Step 1: Download Vivosun App
Search ''Vivosun'' in the Apple App Store or in the Google Play Store to download the Vivosun App.

Step 2. Add AeroStream
Tap ''+'' or ![]() to add AeroStream. When connecting to VIVOSUN app,
to add AeroStream. When connecting to VIVOSUN app, ![]() will flash on the control panel.
will flash on the control panel.
Note: Make sure you have a 2.4G Wi-Fi connection, and that Bluetooth is enabled on your phone.
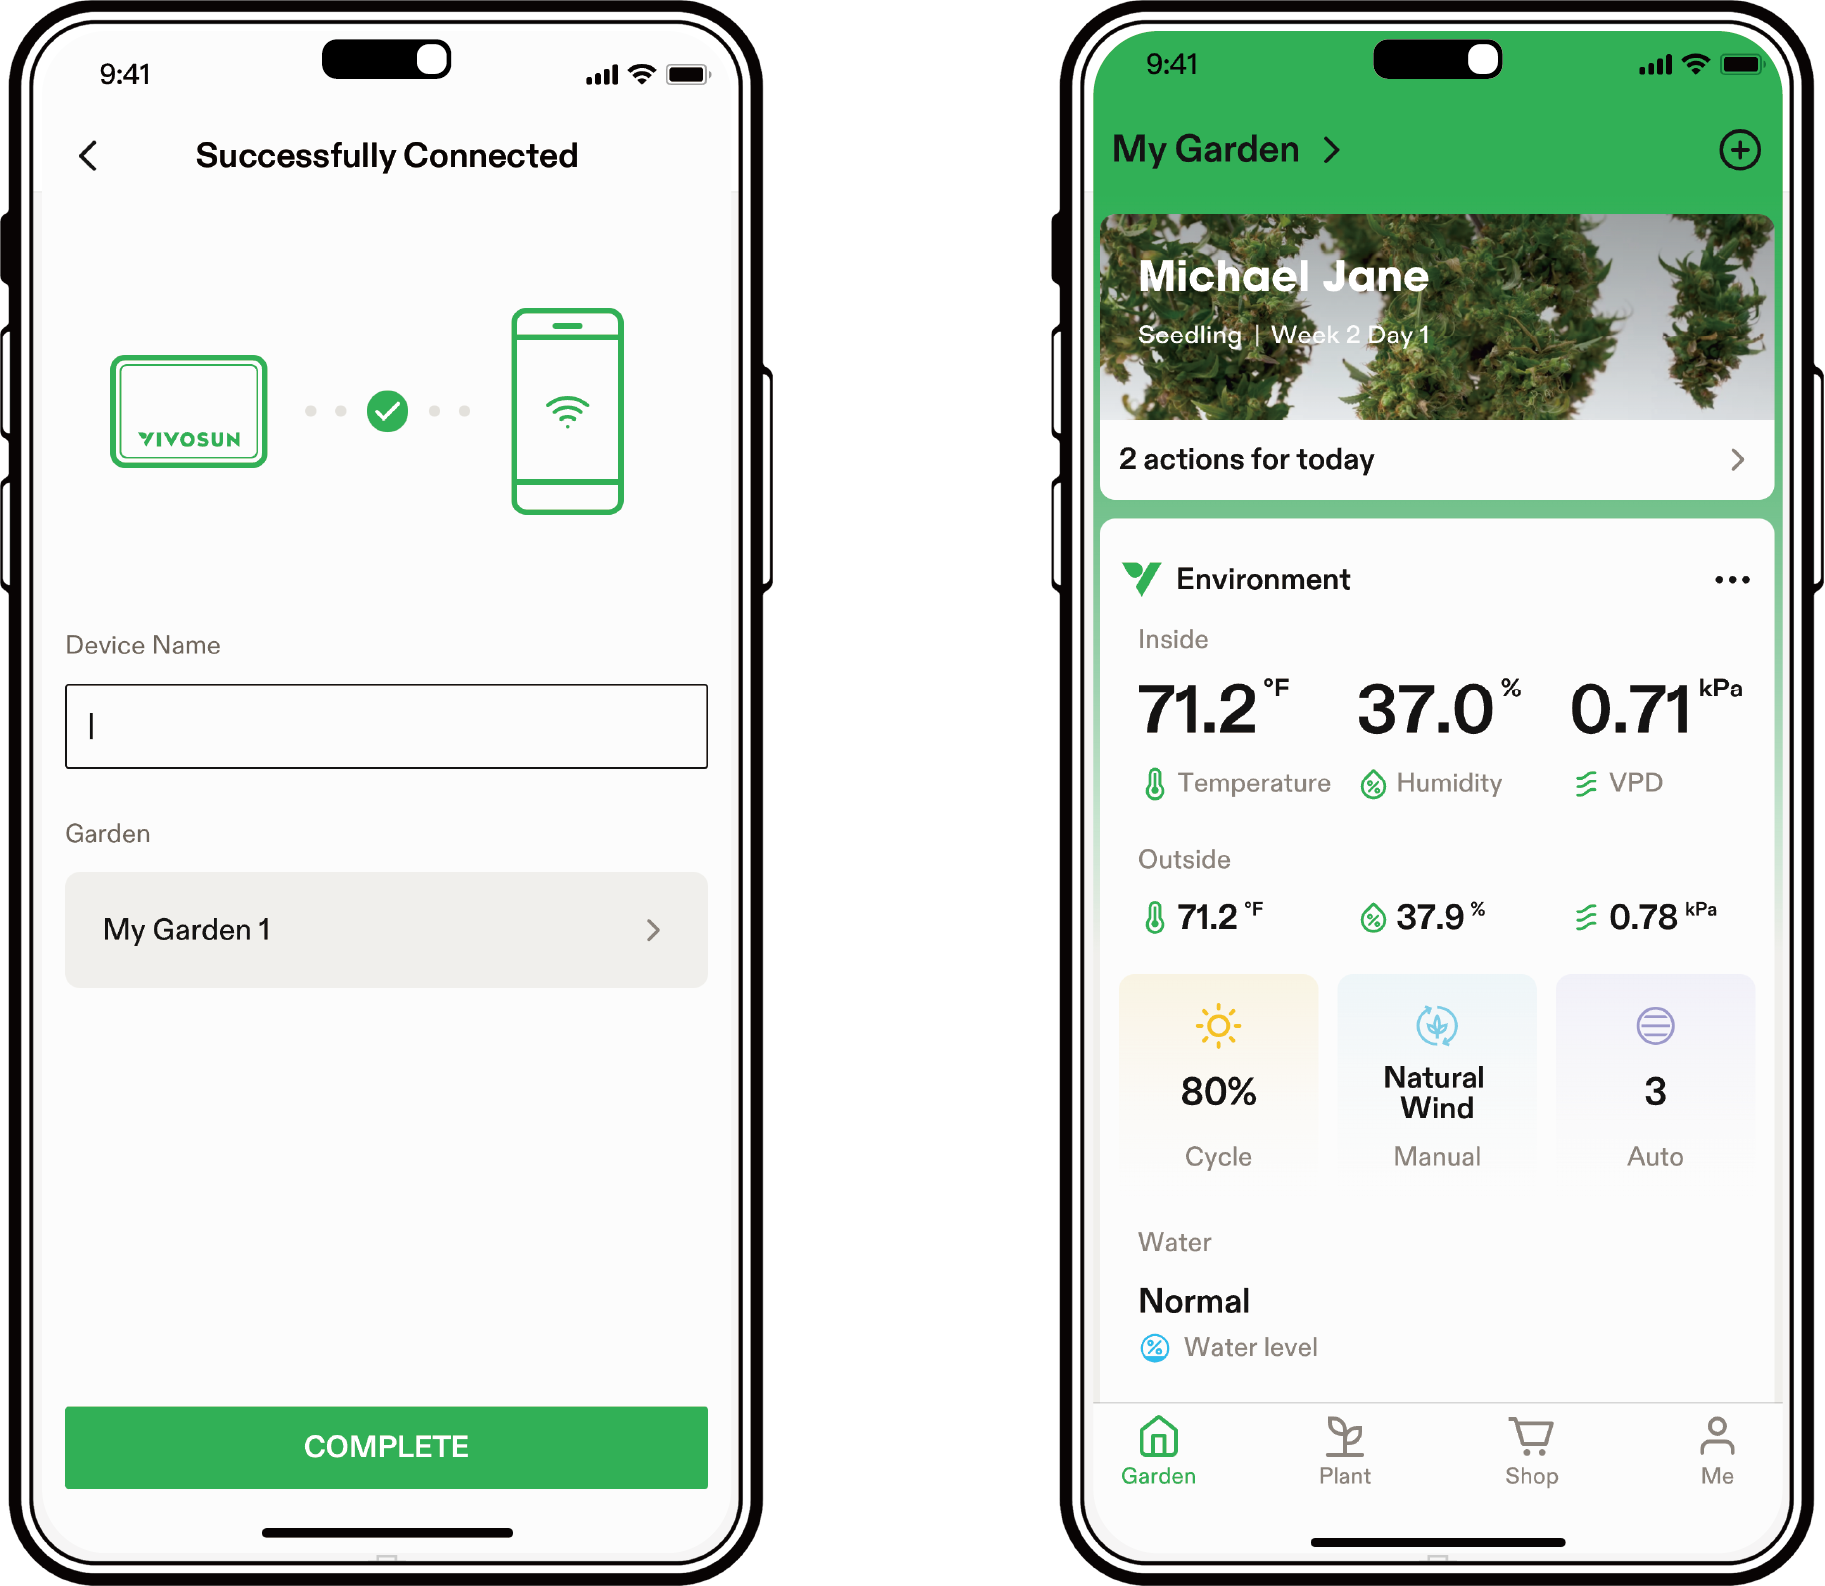
Step 3. Name Device
After connecting successfully, you can rename your device.
Maintenance
Clean and maintain the device on a weekly basis; For optimal performance, use DISTILLED WATER ONLY.
STEP 1
-
Turn off the AeroStream and unplug it from the power outlet.
-
Detach the Top Cover and Mist Outlet / Flexible Hose.
-
Remove the water tank and place it in a sink for cleaning
STEP 2
-
Mix half a cup of distilled water and half a cup of vinegar in a 1:1 ratio.
-
Pour the mixture into the bottom module.
-
Wait 10 minutes.

Distilled water + Vinegar
STEP 3
-
Use the included cleaning brush to gently scrub the surface ionizers to remove any residue or debris.
-
Stand the float upright, cleaning the float and bottom module.
-
Pour the mixture out of the bottom module.
STEP 4
-
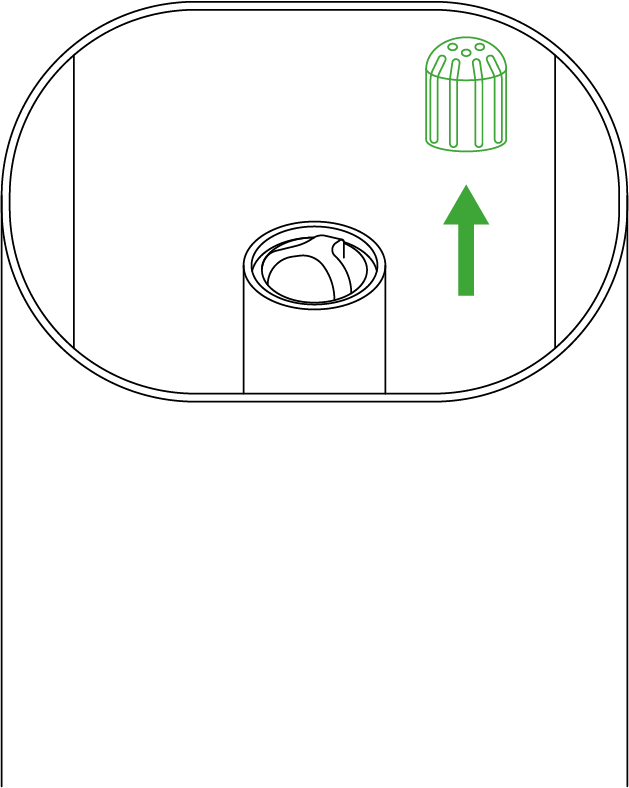
Empty the water tank and remove the filter. Soak the filter in a 1:1 vinegar-water solution for about 10 minutes.
-
Wipe the water tank and top cover with a dry, clean cloth.
-
Gently brush the filter with a cleaning brush, dry it, and reinstall it.
STEP 5
-
Use a clean towel to wipe the surface of the device.
-
Reassemble the bottom module, water tank (with filter properly installed), top cover and outlet/hose.
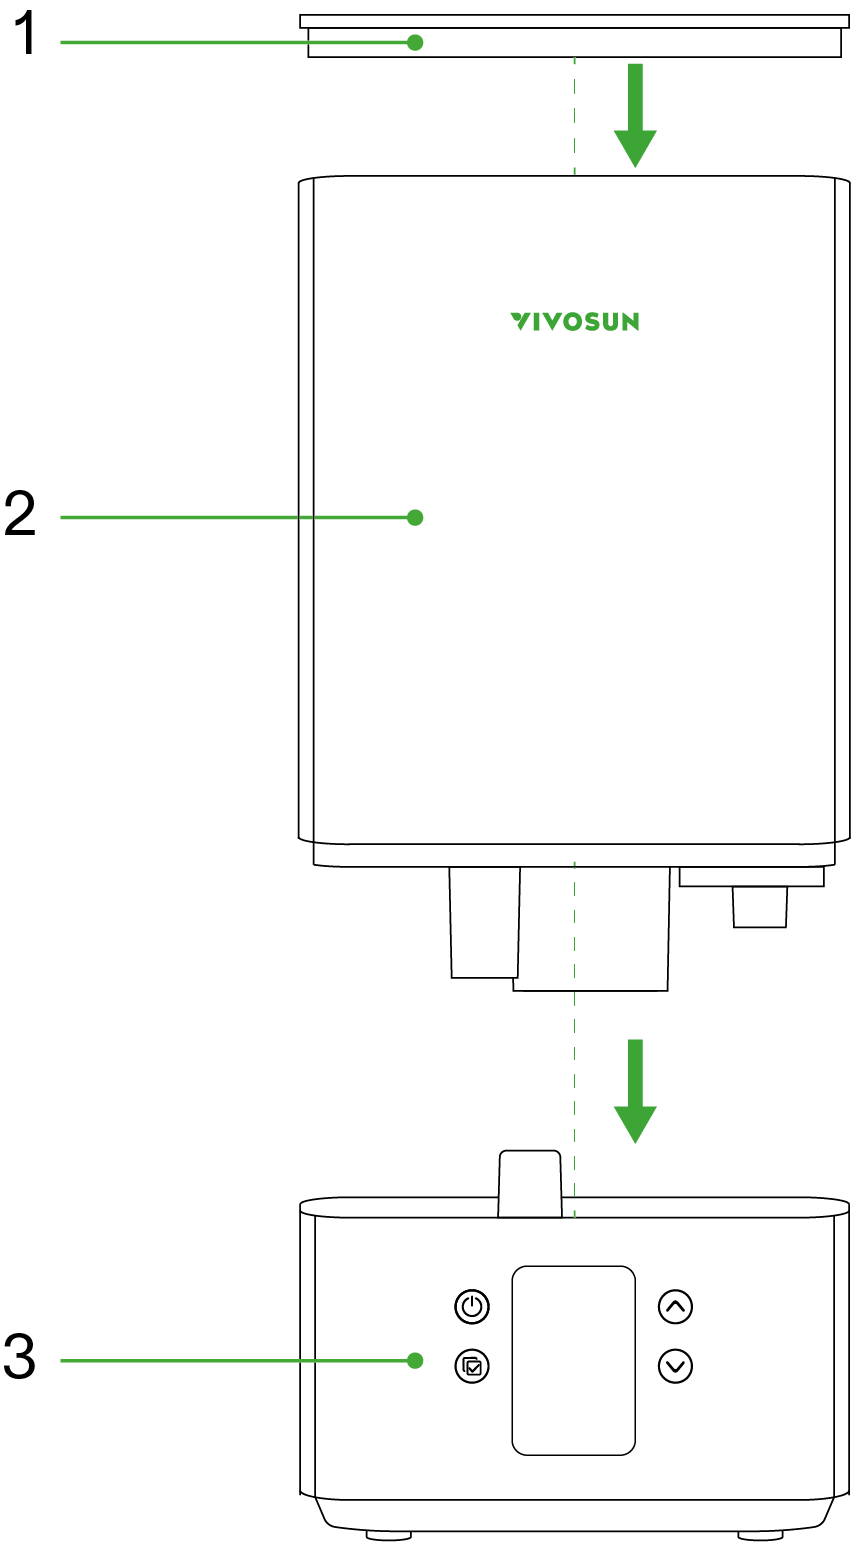
*1. Top Cover
 2. Water Tank
 3. Bottom Module
Warranty
VIVOSUN offers a 2-year limited warranty on this product purchased directly from us or our authorized dealers, beginning on the original date of purchase.
This warranty is provided in addition to, and does not affect, your statutory rights under applicable consumer protection laws in the country where the product was purchased.
For the full Warranty Policy, please visit: https://www.vivosun.com/help/warranty-policy
Alternatively, you may contact customer service at support@vivosun.com / +1 888-505-8486.
FCC Warning
This equipment has been tested and found to comply with the limits for a Class B digital device, pursuant to part 15 of the FCC Rules. These limits are designed to provide reasonable protection against harmful interference in a residential installation. This equipment generates, uses and can radiate radio frequency energy and, if not installed and used in accordance with the instructions, may cause harmful interference to radio communications. However, there is no guarantee that interference will not occur in a particular installation. If this equipment does cause harmful interference to radio or television reception, which can be determined by turning the equipment off and on, the user is encouraged to try to correct the interference by one or more of the following measures:
-
Reorient or relocate the receiving antenna.
-
Increase the separation between the equipment and receiver.
-
Connect the equipment into an outlet on a circuit different from that to which the receiver is connected.
-
Consult the dealer or an experienced radio/TV technician for help.
Caution: Any changes or modifications to this device not explicitly approved by manufacturercould void your authority to operate this equipment.
This device complies with part 15 of the FCC Rules. Operation is subject to the following two conditions:
(1)This device may not cause harmful interference, and (2) this device must accept anyinterference received, including interference that may cause undesired operation.
This equipment complies with FCC radiation exposure limits set forth for an uncontrolled environment. This equipment should be installed and operated with minimum distance 20cm between the radiator and your body
ISED Statement
English: This device contains licence-exempt transmitter(s)/receiver(s) that comply with Innovation, Science and Economic Development Canada’s licence-exempt RSS(s).
Operation is subject to the following two conditions:
(1) This device may not cause interference.
(2) This device must accept any interference, including interference that may cause undesired operation of the device.
French: Cet appareil contient des émetteurs/récepteurs exempts de licence qui sont conformes aux CNR exempts de licence d’Innovation, Sciences et Développement
économique Canada. Le fonctionnement est soumis aux deux conditions suivantes :
(1) Cet appareil ne doit pas causer d’interférences.
(2) Cet appareil doit accepter toute interférence, y compris les interférences susceptibles de provoquer un fonctionnement indésirable de l’appareil.
This device meets the exemption from the routine evaluation limits in section 2.5 of RSS 102 and compliance with RSS 102 RF exposure, users can obtain Canadian information on RF exposure and compliance.
cet appareil est conforme à l’exemption des limites d’évaluation courante dans la section 2.5 du cnr - 102 et conformité avec rss 102 de l’exposition aux rf, les utilisateurs peuvent obtenir des données canadiennes sur l’exposition aux champs rf et la conformité.
This equipment complies with Canada radiation exposure limits set forth for an uncontrolled environment.
This equipment should be installed and operated with minimum distance 20cm between the radiator & your body.
Cet équipement est conforme Canada limites d’exposition aux radiations dans un environnement non contrôlé.
Cet équipement doit être installé et utilisé avec une distance minimale de 20 cm entre le radiateur et votre corps.
Contents

We help you grow your best green.

We provide the highest quality.

We relentlessly pursue the future.

We make growing more enjoyable.

We support every grower.
Sign up and get 10% off your first order
©2026 Vivosun All Rights Reserved